入门—B站视频—2022-08-08发布
环境安装
2023-09-15 16:02:39(开始)
2023-09-21 18:58:02(结束) (15,18,19,20,21)不偷懒的话,真正看起来,三天就够用了
.
高级—B站视频—2017-09-20发布
2023-09-22 07:17:15(开始)
2023-09-22 18:44:00(结束) 一天耗时
感悟
1 | 2023-09-20 18:37:32 |
Python简介
1 | # 诞生 |
Pycharm设置
1 | 1. exe 拦截器 3.11 |
注释/type/变量/类型转换
1 | # 注释 |
字符串
1 | # 三种定义 |
输入
1 | name = input('你是谁?') |
运算符
1 | # == != > < >= <= |
判断
1 | if 条件: |
循环
1 | 关键字 continue break |
函数
1 | # 定义 |
【日期标记】2023-09-15 19:17:13 以上同步完成
容器
列表 list
1 | # 列表 => 上限2^63-1, 类型混装, 可重复, 有下标, 有序, 可增删改 |
元组 tuple
1 | # 元组 => 不可修改 |
字符串 str
1 | # 字符串 => 不可修改 |
序列
1 | # 序列 => 内容连续、有序,可使用下标访问的容器 如:列表、元组、字符串 |
集合 set
1 | # 集合 => 去重, 无下标, 无序, 可增删改 |
字典 dict
1 | # 字典 => 键值对 |
转换/排序
1 | # 总结 |
文件
读/写/追加
1 | f = open('path', 'r/w/a', encoding='UTF-8') |
是否存在/是否文件夹/查看列表
1 | import os |
递归查看文件夹下所有文件
1 | import os |
异常
1 | try: |
模块
模块导入
1 | # [from 模块名] import [模块 | 类 | 变量 | 函数 | *] [as 别名] |
自定义模块
1 | 1. 导入多模块,同名 最后一个生效 |
包 无init
1 | # taopanfeng.py |
包 有init
1 | # taopanfeng.py |
第三方包
1 | # 三方包 |
json
1 | import json |
echarts
数据可视化库pyecharts简单入门—CSDN
pyecharts 参数讲解
pyecharts 参考案例
echarts 官方案例
安装pip install pyecharts
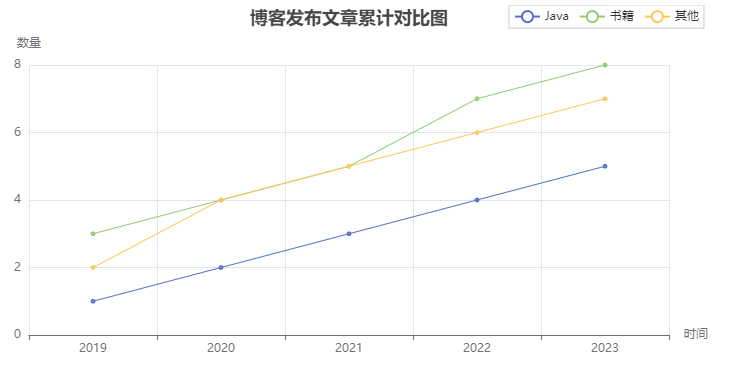
折线图 入门
1 | from pyecharts.charts import Line |
折线图 实战
1 | from pyecharts.charts import Line |
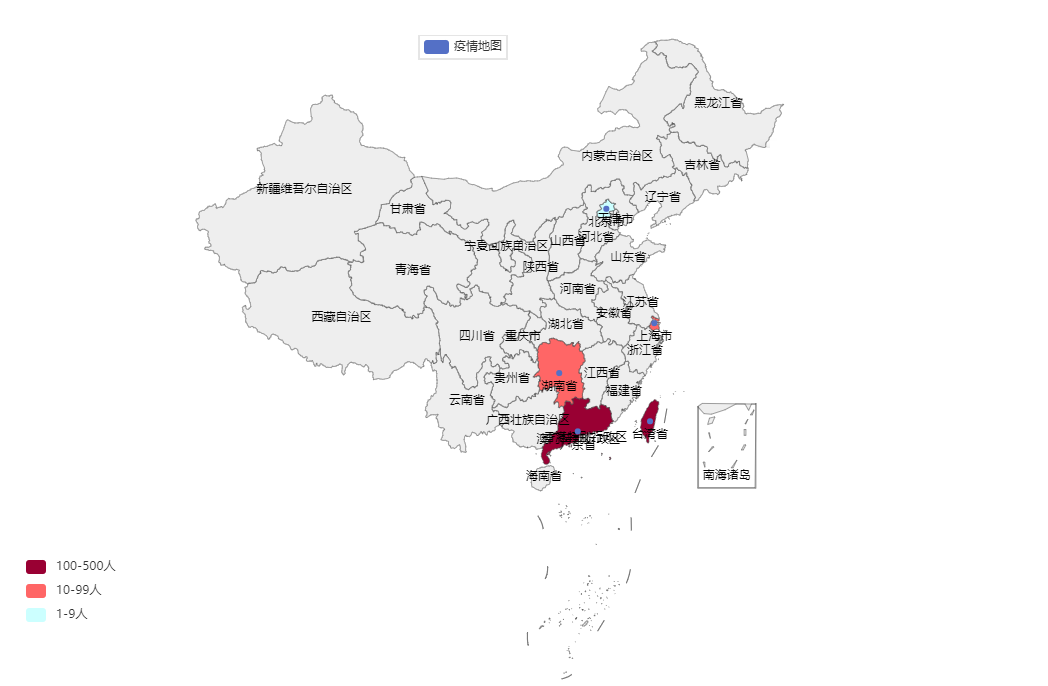
地图
1 | from pyecharts.charts import Map |
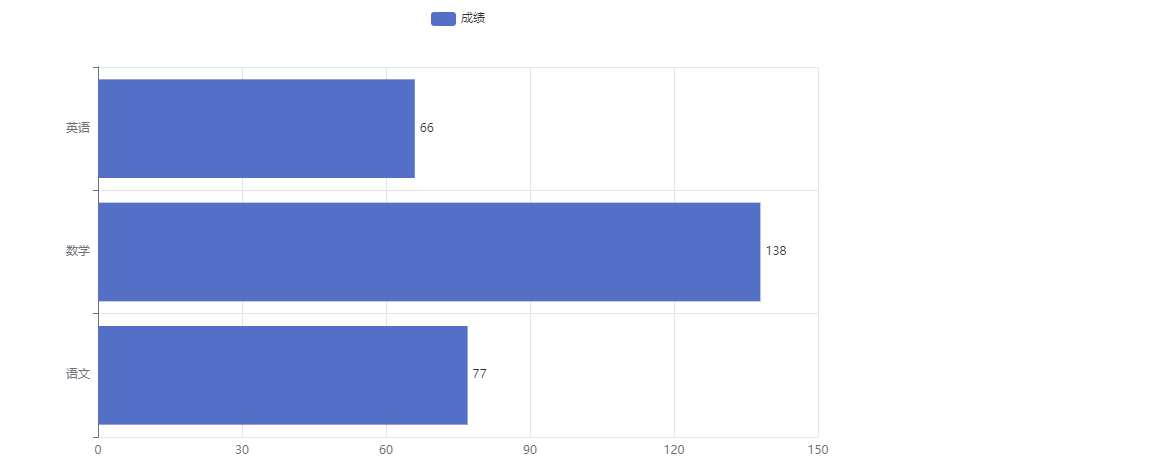
柱状图 反转xy
1 | from pyecharts.charts import Bar |
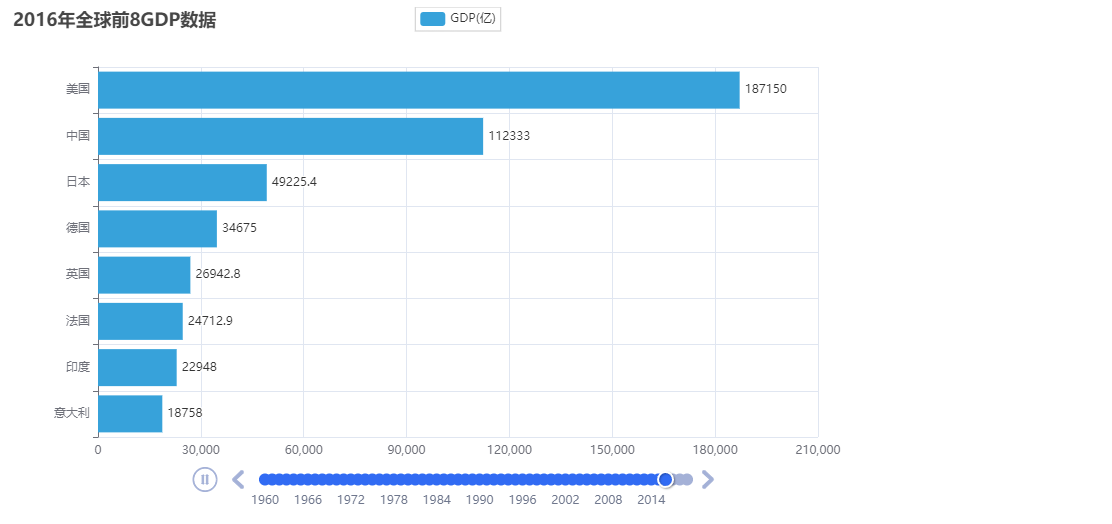
柱状图 动态
1 | from pyecharts.charts import Bar, Timeline |
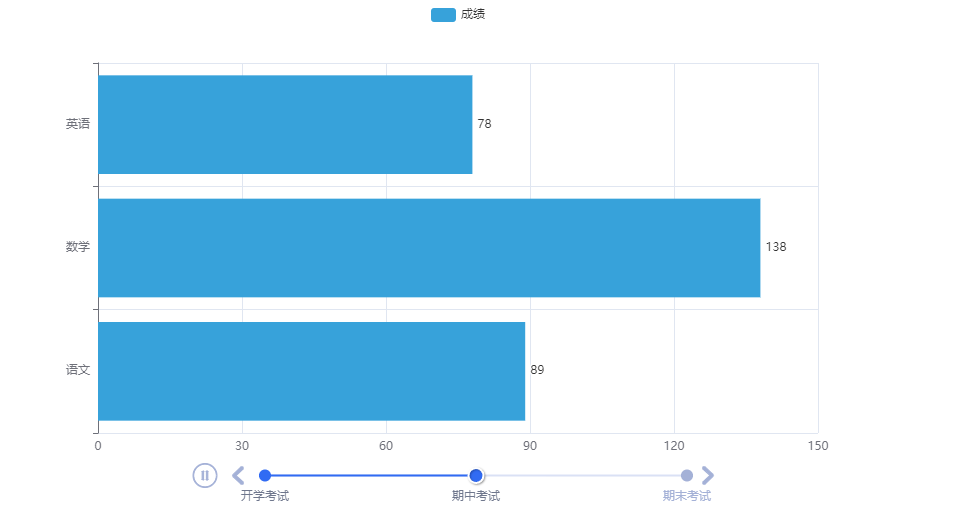
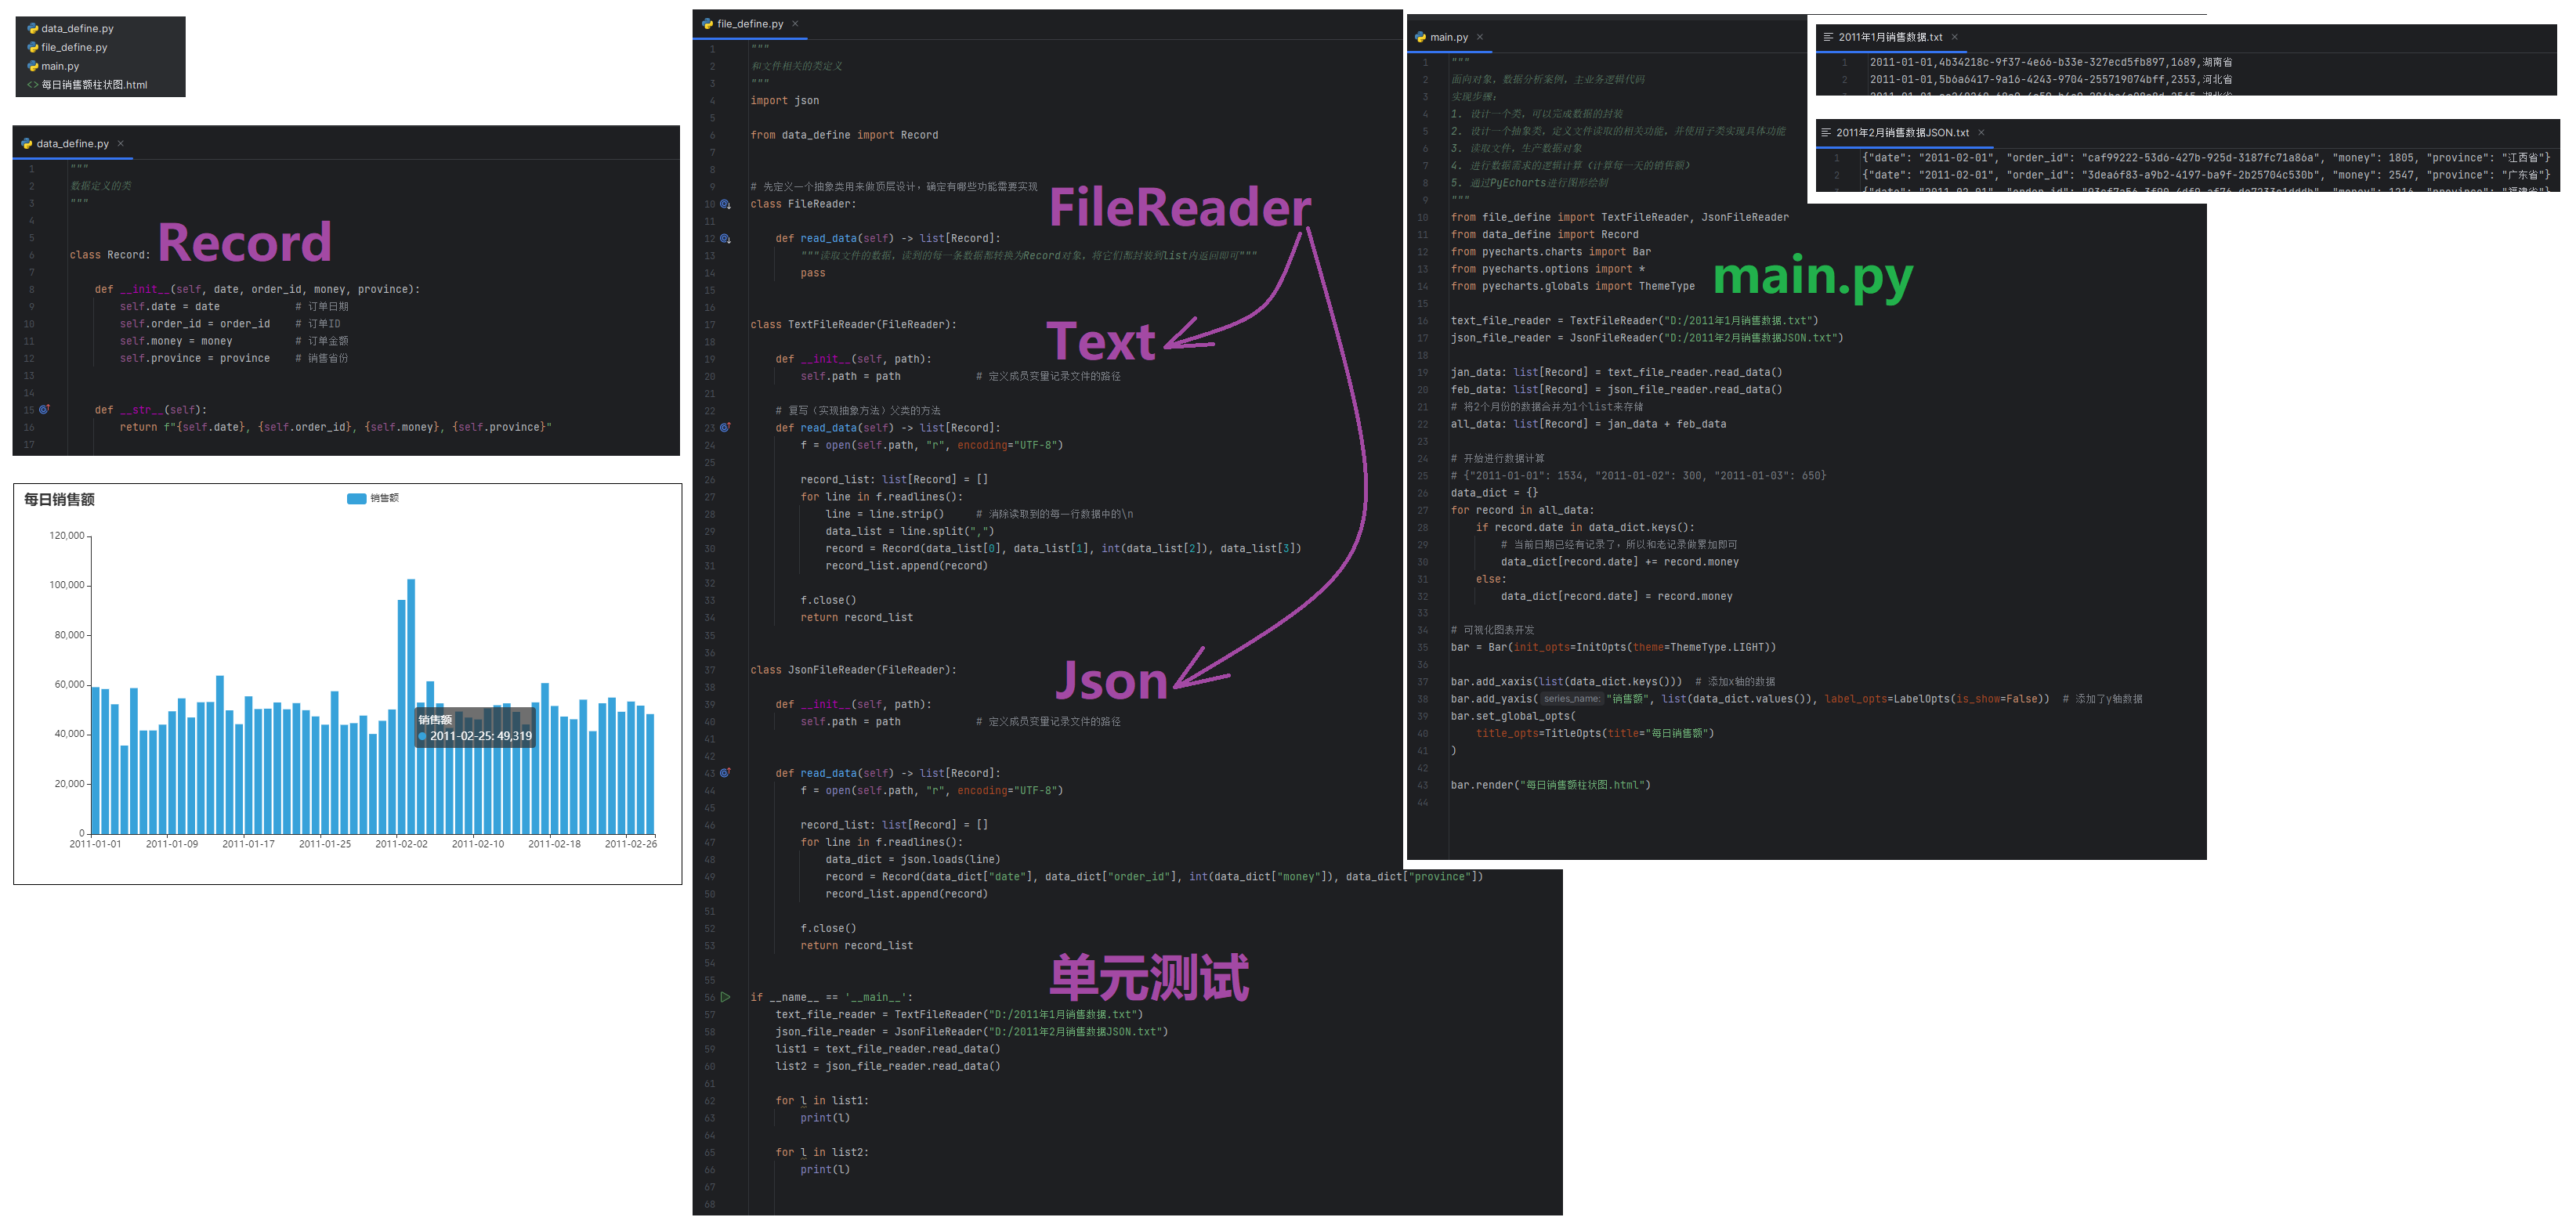
柱状图 动态/csv
1 | from pyecharts.charts import Bar, Timeline |
【日期标记】2023-09-20 18:36:45 以上同步完成
对象
无参构造
1 | class Student: |
__init__ 有参构造
1 | class Student: |
__str__ 对象转字符串
1 | class Student: |
__lt__ 大于 小于 比较
1 | class Student: |
__le__ 大于等于 小于等于 比较
1 | class Student: |
__eq__ 等于 不等 比较
1 | class Student: |
私有属性 私有方法
1 | class Student: |
继承
1 | class A: |
super使用
1 | class A: |
类型注解
1 | # Python 3.5 引入'类型注解' |
多态
1 | class Animal: |
面向对象-pyecharts
【日期标记】2023-09-21 10:45:52 以上同步完成
SQL
1 | # pip install pymysql |
Spark
初探pyspark
1 | # pip install pyspark # 需要开启代理 |
RDD
1 | """ |
map
1 | from pyspark import SparkConf, SparkContext |
flatMap
1 | from pyspark import SparkConf, SparkContext |
reduceByKey
1 | from pyspark import SparkConf, SparkContext |
filter
1 | from pyspark import SparkConf, SparkContext |
distinct
1 | from pyspark import SparkConf, SparkContext |
sortBy
1 | from pyspark import SparkConf, SparkContext |
collect/reduce/take/count
1 | from pyspark import SparkConf, SparkContext |
saveAsTextFile
1 | """ |
案例 小时段单词检索 v1:本地 单机运行
1 | from pyspark import SparkConf, SparkContext |
案例 小时段单词检索 v2:服务器 集群运行
1 | from pyspark import SparkConf, SparkContext |
【日期标记】2023-09-21 16:35:41 以上同步完成
global
未使用 global
1 | x = 4 |
global 定义单个
1 | x = 4 |
global 定义多个
1 | x = 1 |
闭包
在函数嵌套的前提下,内部函数使用了外部函数的变量,并且外部函数返回了内部函数,我们把这个使用外部函数变量的内部函数称为闭包。
闭包的作用:闭包可以保存函数内的变量,不会随着函数调用完而销毁。
1 | """ |
装饰器
装饰器其实也是一种闭包, 其功能就是在不破坏目标函数原有的代码和功能的前提下,为目标函数增加新功能。
装饰器 闭包写法
1 | def outer(func): |
装饰器 语法糖写法
1 | def outer(func): |
装饰器 方法耗时打印
1 | import time |
装饰器 参数
1 | def logging(fn): |
装饰器 返回值
1 | def logging(fn): |
装饰器 不定长参数
1 | def logging(fn): |
装饰器 通用
1 | def logging(fn): |
装饰器 多个装饰器
1 | def check1(fn1): |
装饰器 带参-错误用法
1 | # 装饰器 |
装饰器 带参-正确用法
1 | # 装饰器 |
__call__
1 | # 定义一个类,实现__call__方法 |
类装饰器
1 | # 定义类装饰器 |
单例
单例模式就是对一个类,只获取其唯一的类实例对象,持续复用它。
1、节省内存
2、节省创建对象的开销
1 | # str_tools_py.py |
工厂
将对象的创建由使用原生类本身创建 》》》变为》》》由特定的工厂方法来创建
1 | class Person: |
进程
2023-09-22 17:50:55 补
创建/启动/pid ppid
1 | """ |
进程不共享全局变量
1 | import multiprocessing |
等待所有子进程结束
1 | import multiprocessing |
线程
创建/启动/传参
1 | """ |
线程执行无序
线程之间执行是无序的,它是由cpu调度决定的 ,cpu调度哪个线程,哪个线程就先执行,没有调度的线程不能执行。
进程之间执行也是无序的,它是由操作系统调度决定的,操作系统调度哪个进程,哪个进程就先执行,没有调度的进程不能执行。
1 | import threading |
等待所有子线程结束
1 | import threading |
守护线程
主线程退出,所有子线程销毁
1 | import threading |
共享全局变量
1 | import threading |
共享变量:不准确
1 | import threading |
共享变量:join
1 | import threading |
共享变量:lock
1 | import threading |
网络编程
socket(套接字;插座;)
socket 是进程之间通信一个工具,好比现实生活中的插座,所有的家用电器要想工作都是基于插座进行,进程之间想要进行网络通信需要socket。
下载 netAssist.exe 网络调试助手
请求交互图

简单的聊天
server 服务器
1 | import socket |
client 客户端
1 | import socket |
静态服务器:固定页面
1 | import socket |
静态服务器:指定页面
1 | import socket |
静态服务器:多线程
1 | import socket |
静态服务器:面向对象
1 | import socket |
静态服务器:指定端口号
1 | import socket |
正则表达式
正则表达式,又称规则表达式(Regular Expression)
基础
1 | import re |
进阶
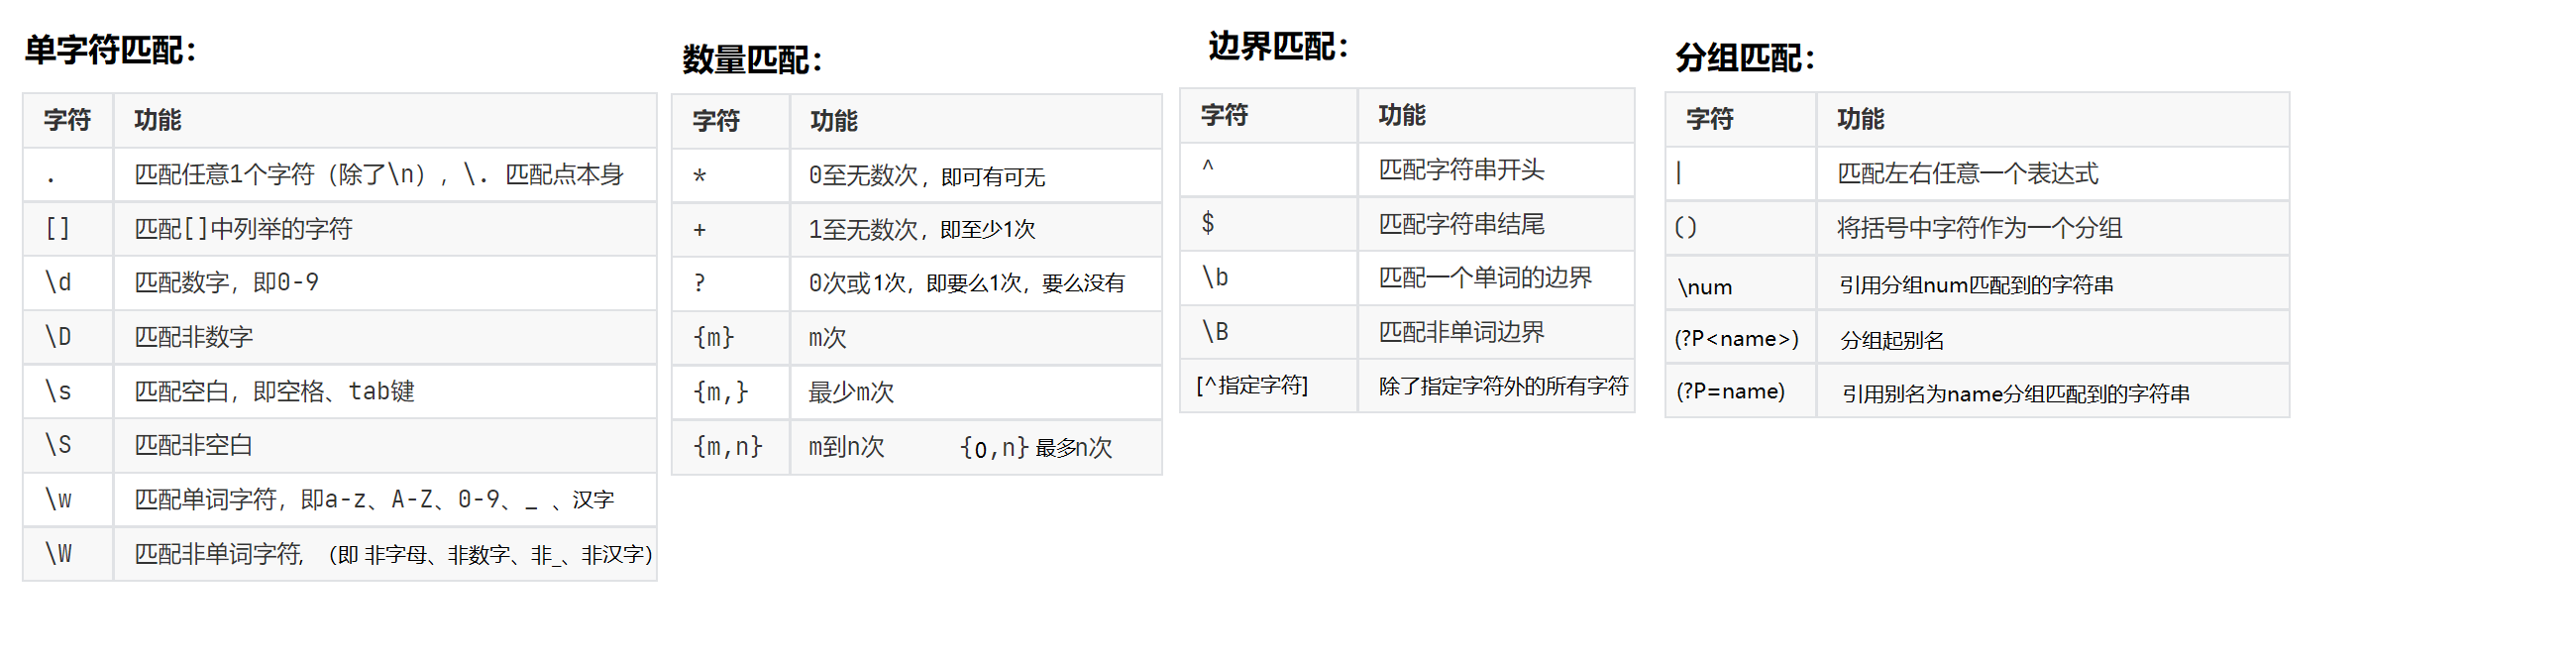
1 | import re |
property属性
装饰器方式
1 | class Person(object): |
类属性方式
1 | class Person(object): |
上下文管理器
with关键字
1 | # with关键字 |
上下文管理器
1 | # 1定义一个File类 |
生成器
每次调用生成器只生成一个值,可以节省大量内存。
生成器推导式
小括号 => 生成器推导式
1 | my_list = [1, 2, 3, 4, 5] |
yield关键字
def函数中具有yield关键字
1 | def generater(num): |
copy 深浅拷贝
1 | import copy |
logging 日志
1 | import logging |
关键字
1 | from import as |