Mybatis常见面试题总结_Java_a745233700的博客-CSDN博客
mybatis 模糊查询 mapper.xml的写法 - sc6231565的专栏 - CSDN博客
Mybatis 获取自增主键值(Mysql,Oracle)
Mybatis-plus 小总结
【精选】MyBatis-@param注解详解_mybatis @param-CSDN博客 2023-11-22 10:25:52
概述
- 什么是框架?
1
2
3
它是我们软件开发中的一套解决方案,不同的框架解决的是不同的问题。
使用框架的好处:
框架封装了很多的细节,使开发者可以使用极简的方式实现功能。大大提高开发效率。 - 三层架构
1
2
3
4
5
6
表现层:
是用于展示数据的
业务层:
是处理业务需求
持久层:
是和数据库交互的 - 持久层技术解决方案
1
2
3
4
5
6
7
8
9
10
11
12
JDBC技术:
Connection
PreparedStatement
ResultSet
Spring的JdbcTemplate:
Spring中对jdbc的简单封装
Apache的DBUtils:
它和Spring的JdbcTemplate很像,也是对Jdbc的简单封装
以上这些都不是框架
JDBC是规范
Spring的JdbcTemplate和Apache的DBUtils都只是工具类 - mybatis的概述
1
2
3
4
5
6
7
8
9
10
11
12
13
14
15
16
17
18
mybatis是一个持久层框架,用java编写的。
它封装了jdbc操作的很多细节,使开发者只需要关注sql语句本身,而无需关注注册驱动,创建连接等繁杂过程
它使用了ORM思想实现了结果集的封装。
ORM:
Object Relational Mappging 对象关系映射
简单的说:
就是把数据库表和实体类及实体类的属性对应起来
让我们可以操作实体类就实现操作数据库表。
user User
id userId
user_name userName
今天我们需要做到
实体类中的属性和数据库表的字段名称保持一致。
user User
id id
user_name user_name
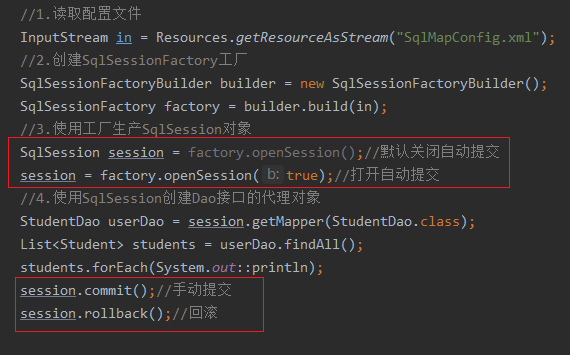
简单入门
配置方式实现
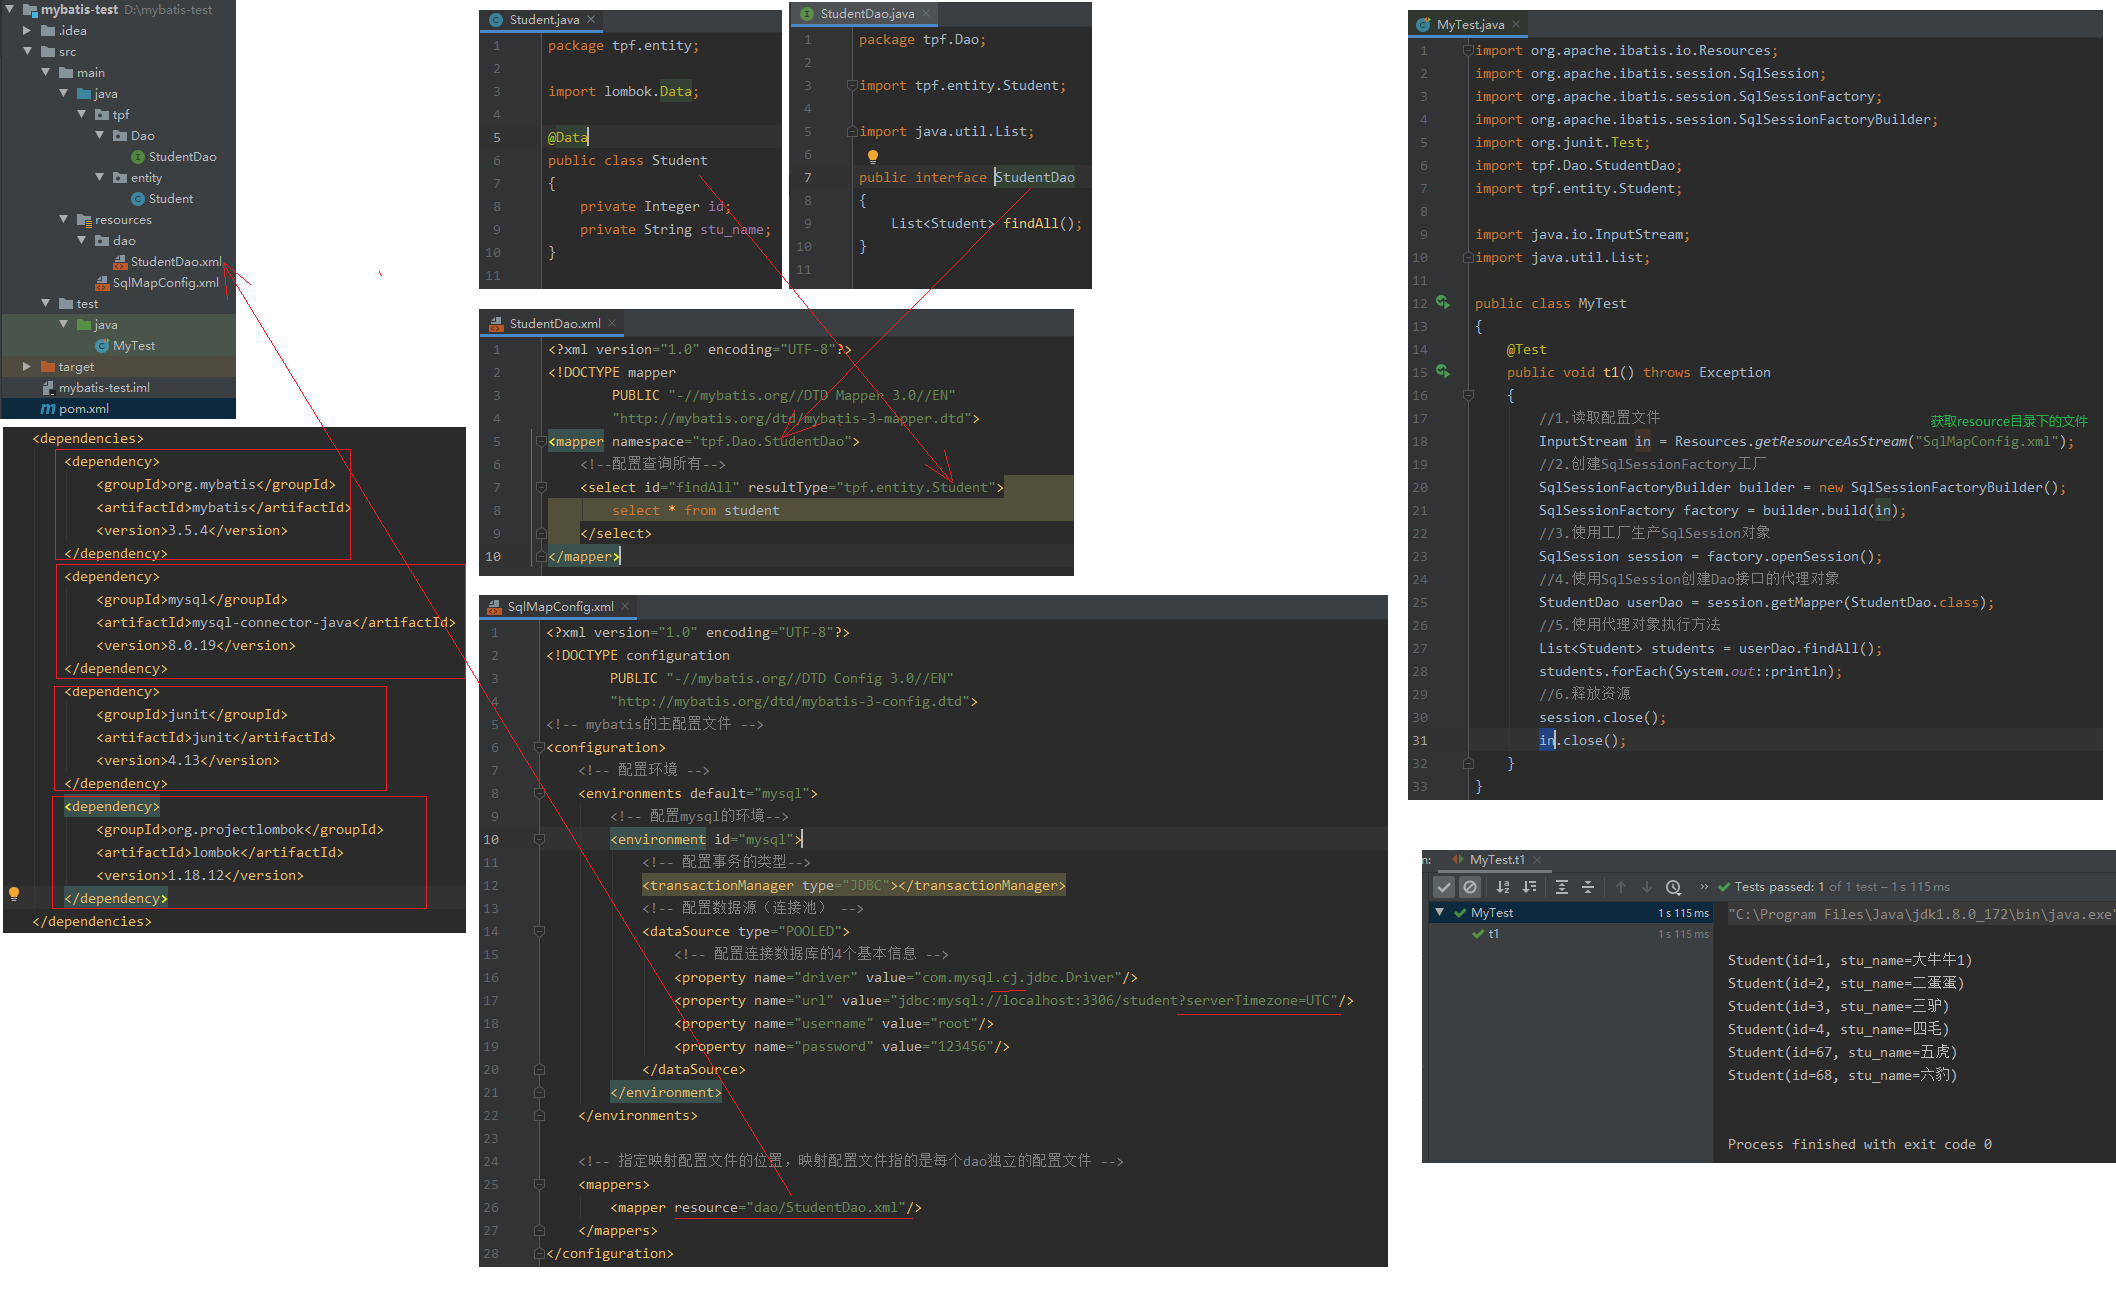
SqlMapConfig.xml
1 |
|
MyTest.java
1 | public class MyTest |
注解实现
只需要在上述步骤改动两个部分即可。
(1)在接口方法上加@select注解
(2)在mapper中配置class="tpf.Dao.StudentDao"来指定接口,同时也要注释之前的resource="dao/StudentDao.xml"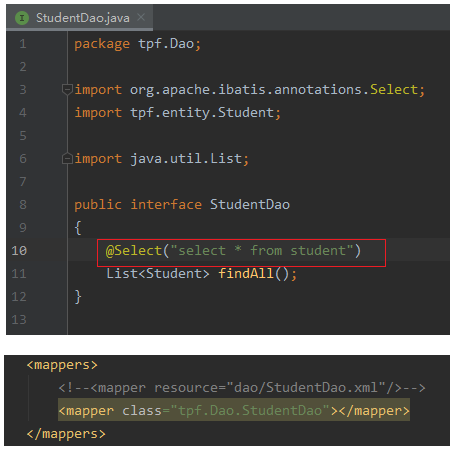
自定义Mybatis
- 分析
- 实现
本地源码文件E:\Everything\Work\2019java课程完结版\HMjava\00 讲义+笔记+资料\4.主流框架\31.Mybatis\mybatis\mybatis_day01\代码\mybati第一天源码\day01_eesy_04mybatis_design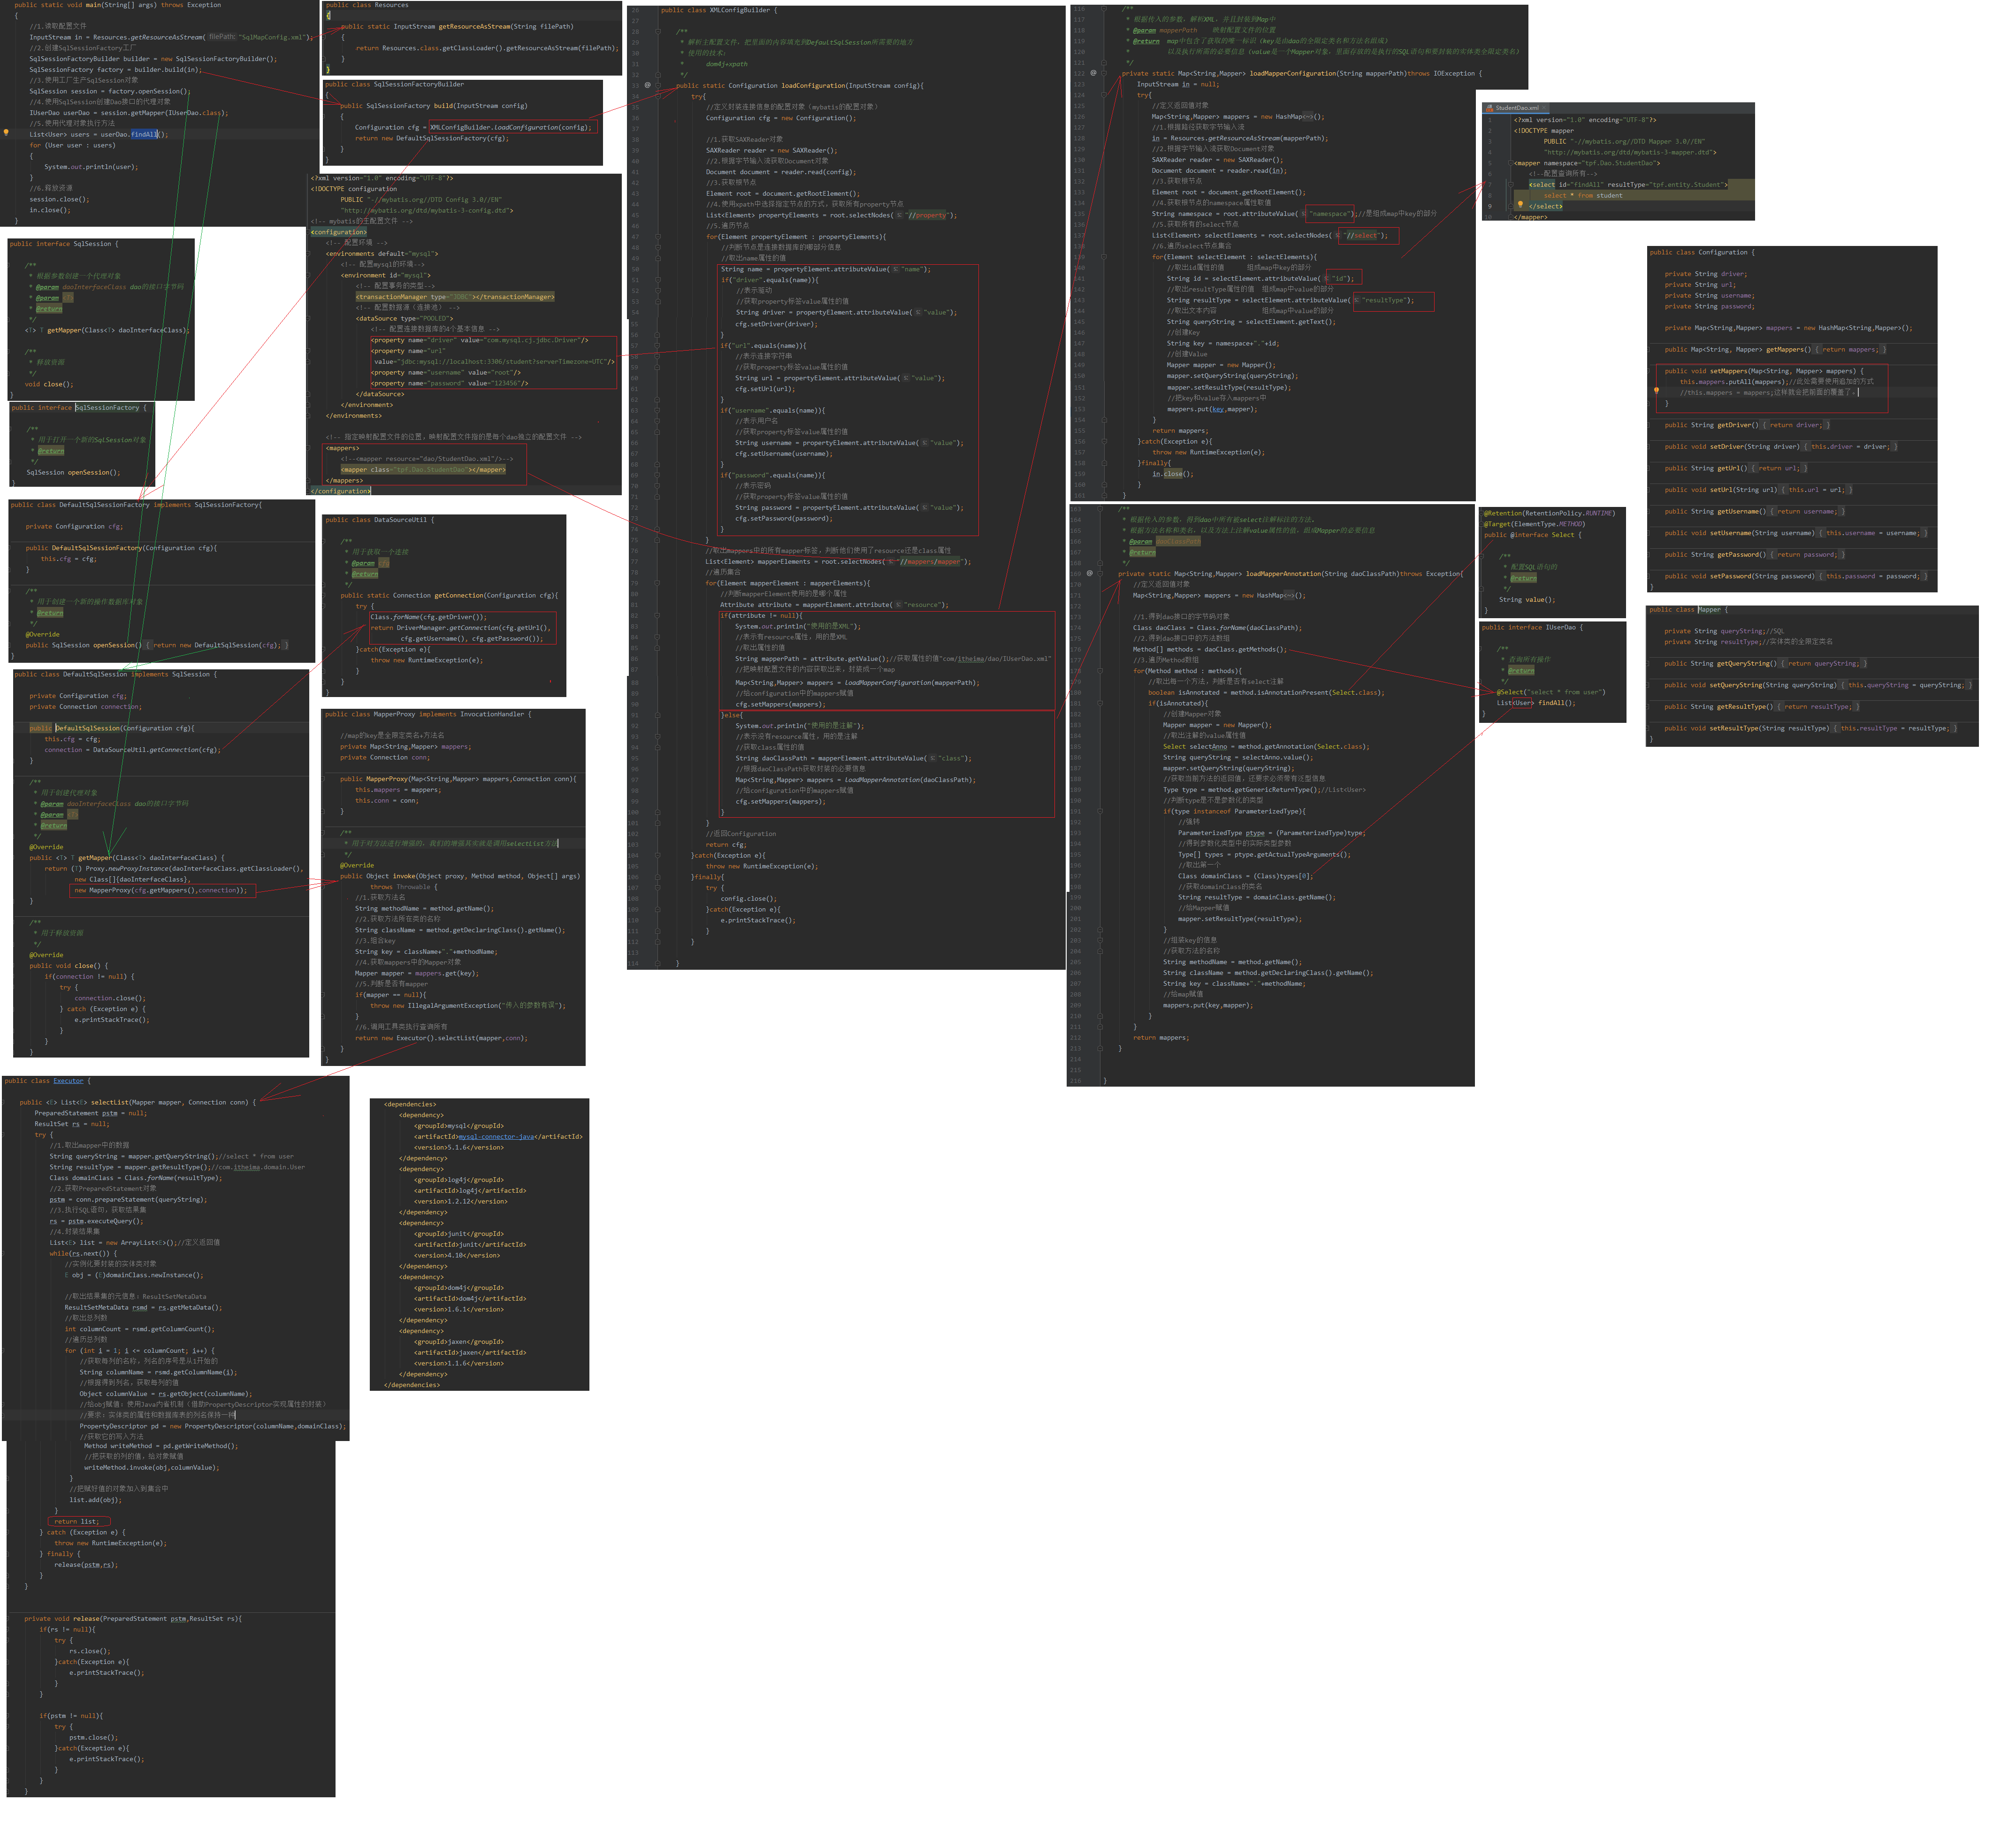
CRUD
- 根据ID查询
1
2
3
4
5
6
7
8
9
10
User findById(Integer userId);
<select id="findById" resultType="com.itheima.domain.User" parameterType="int">
select * from user where id = #{uid}
</select>
id:方法名
resultType:返回值类型
parameterType:参数类型
#{}:相当于jdbc中的?占位符【此时传参就一个基本类型,也可以不与参数名称一致】 - 新增【记得要使用session.commit();进行提交】
1
2
3
4
5
6
7
8
9
10
11
12
13
14
15
int saveUser(User user);
<insert id="saveUser" parameterType="com.itheima.domain.User">
insert into user(username,birthday,sex,address)
values(#{username},#{birthday},#{sex},#{address})
</insert>
parameterType:传入的参数是一个对象,所以需要全限定类名。
#{}:此处写的是User对象的属性名称。它用的是ognl表达式。
ognl 表达式:
它是 apache 提供的一种表达式语言,全称是:
Object Graphic Navigation Language 对象图导航语言
它是按照 #{对象.对象} 获取数据的。
【这里我们parameterType指定了User,所以可以直接写属性】 - 新增并返回Id
1
2
3
4
5
6
7
8
9
10
11
12
13
14
15
int savaStudent(Student student);
<insert id="savaStudent" parameterType="tpf.entity.Student">
<!-- 配置插入操作后,获取插入数据的id -->
<selectKey keyProperty="id" keyColumn="id" resultType="int" order="AFTER">
select last_insert_id();
</selectKey>
insert into student values(null ,#{stu_name});
</insert>
Student student = new Student(null, "5555");
System.out.println(student);// Student(id=null, stu_name=5555)
int i = userDao.savaStudent(student);
System.out.println(i);// 1
System.out.println(student);// Student(id=114, stu_name=5555) - 更新
1
2
3
4
5
6
int updateUser(User user);
<update id="updateUser" parameterType="com.itheima.domain.User">
update user set username=#{username},birthday=#{birthday},sex=#{sex},
address=#{address} where id=#{id}
</update> - 删除
1
2
3
4
5
int deleteUser(Integer userId);
<delete id="deleteUser" parameterType="java.lang.Integer">
delete from user where id = #{uid}
</delete> - 模糊查询
1
2
3
4
5
6
7
List<User> findByName(String username);
<select id="findByName" resultType="com.itheima.domain.User" parameterType="String">
select * from user where username like #{username}
</select>
List<User> users = userDao.findByName("%王%"); - #{}与${}的区别
1
2
3
4
#{}表示一个占位符号:
#{}可以有效防止 sql 注入,等同于jdbc中的?
${}表示拼接 sql 串 :
如果parameterType 是简单类型,那么只能使用${value}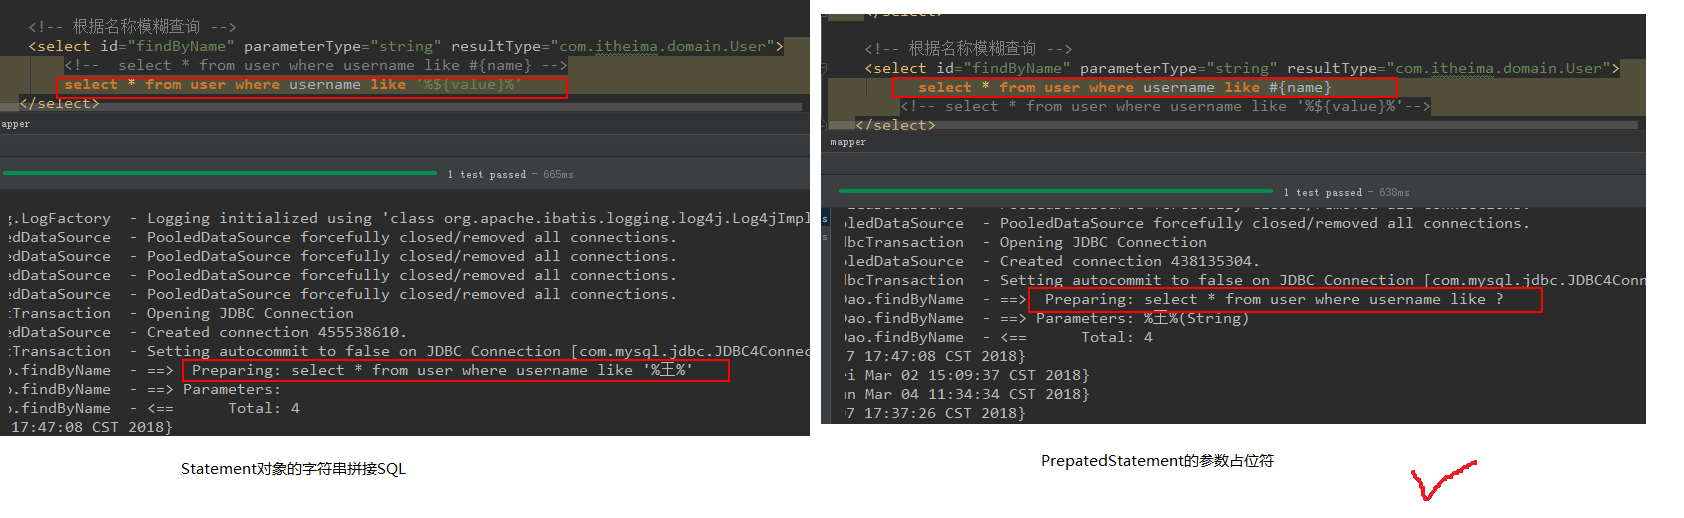
- 查询总记录数
1
2
3
4
5
6
7
int findTotal();
<select id="findTotal" resultType="int">
select count(*) from user;
</select>
int res = userDao.findTotal(); - 注意事项
基本类型和String我们可以直接写类型名称,也可以使用包名.类名的方式 ,例如:java.lang.String
实体类类型,目前我们只能使用全限定类名。
- 传递包装类对象
1
2
3
4
5
6
7
8
9
10
11
12
public class QueryVo implements Serializable {
private User user;
public User getUser() {return user; }
public void setUser(User user) { this.user = user; }
}
List<User> findByVo(QueryVo vo);
<select id="findByVo" resultType="com.itheima.domain.User"
parameterType="com.itheima.domain.QueryVo">
select * from user where username like #{user.username};
</select>
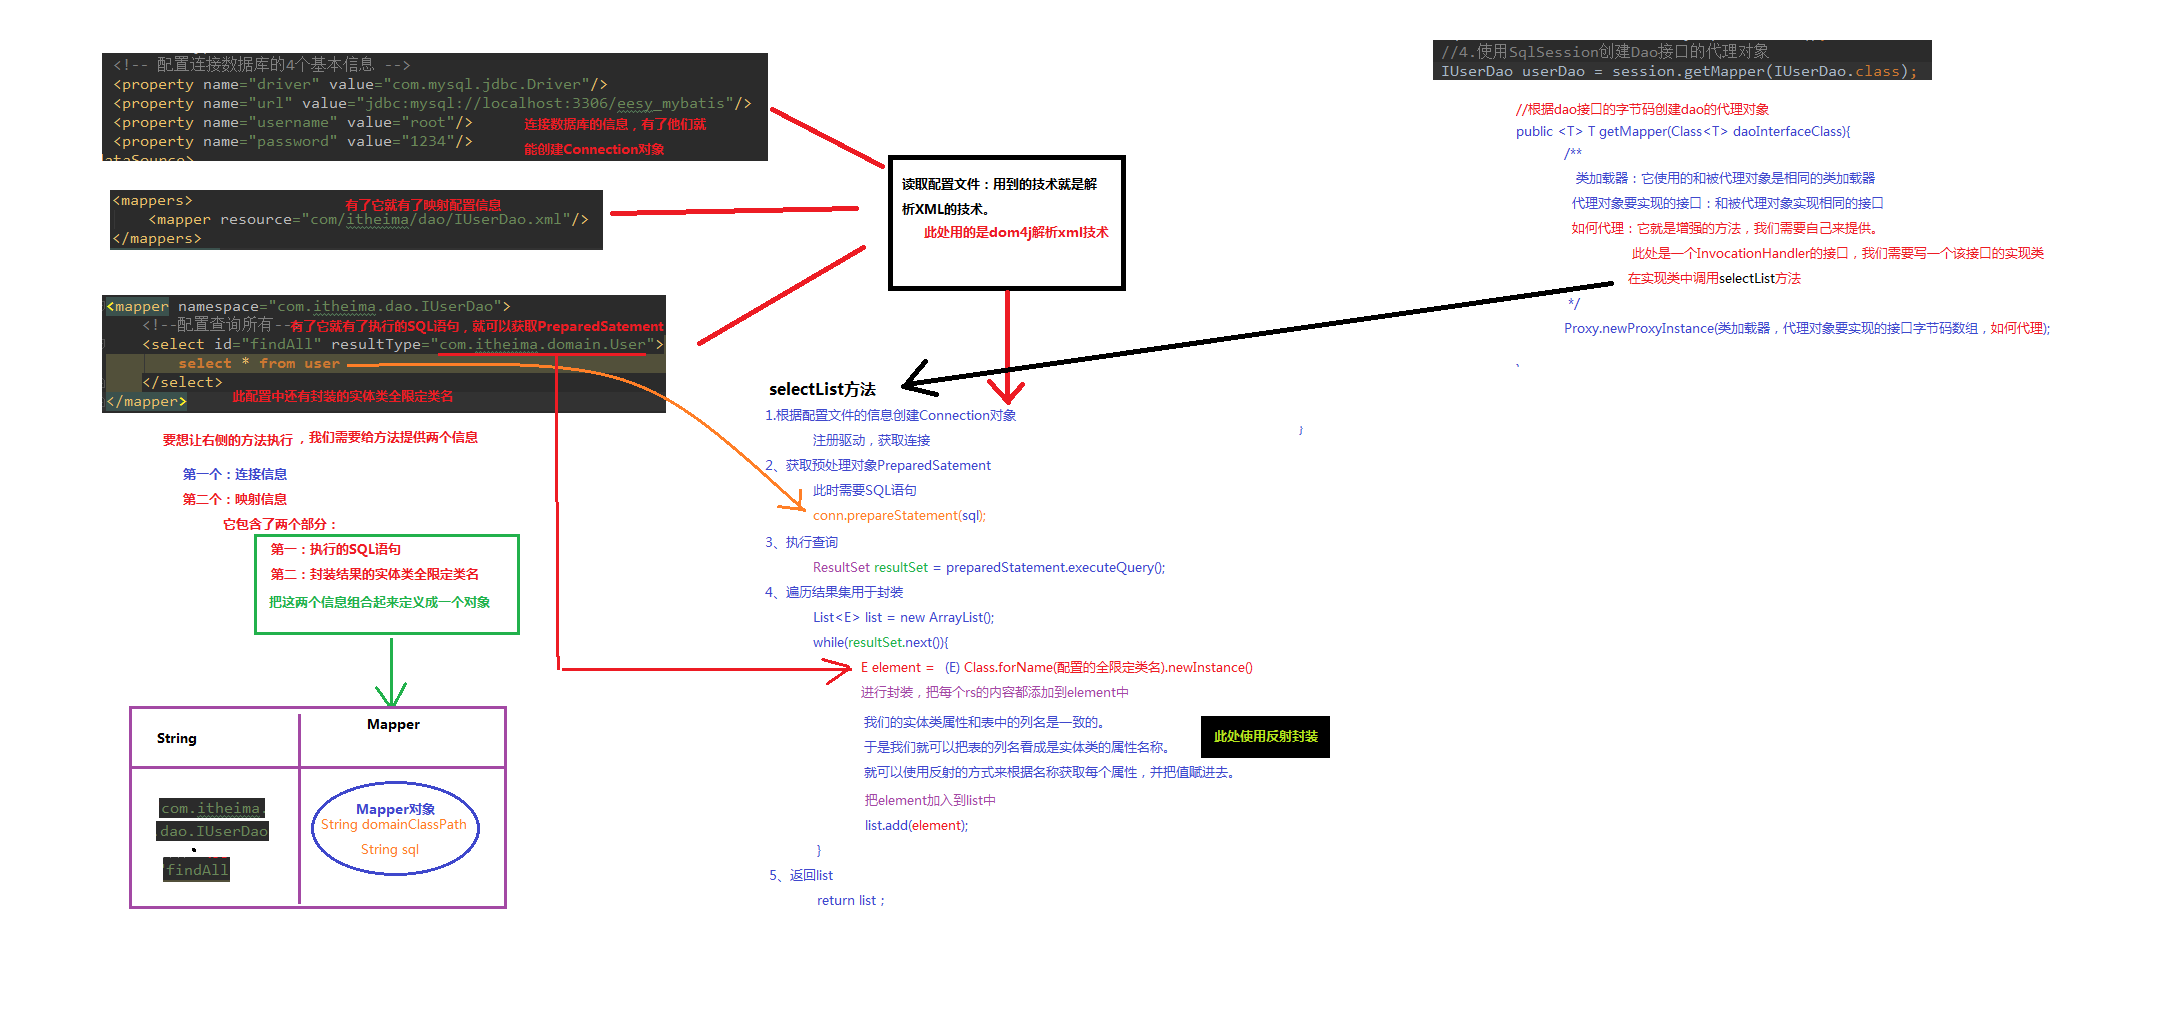
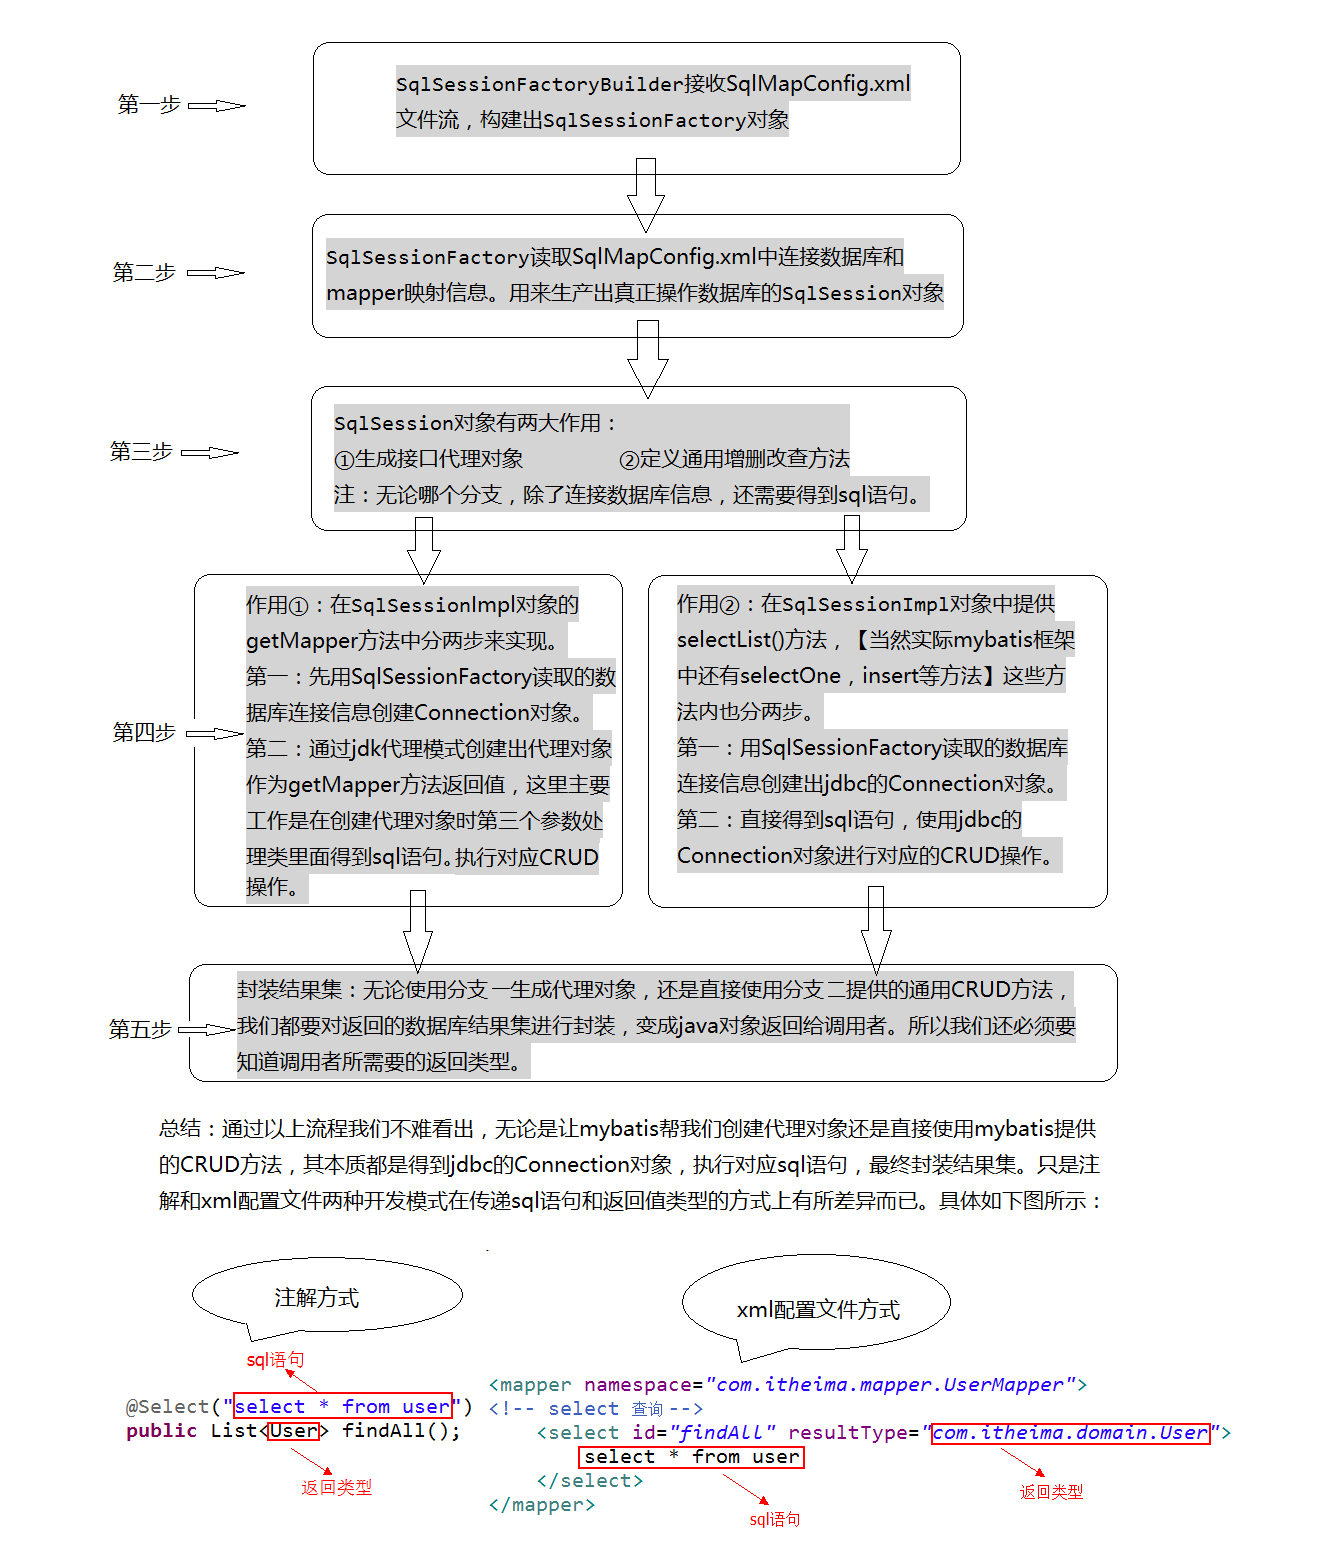
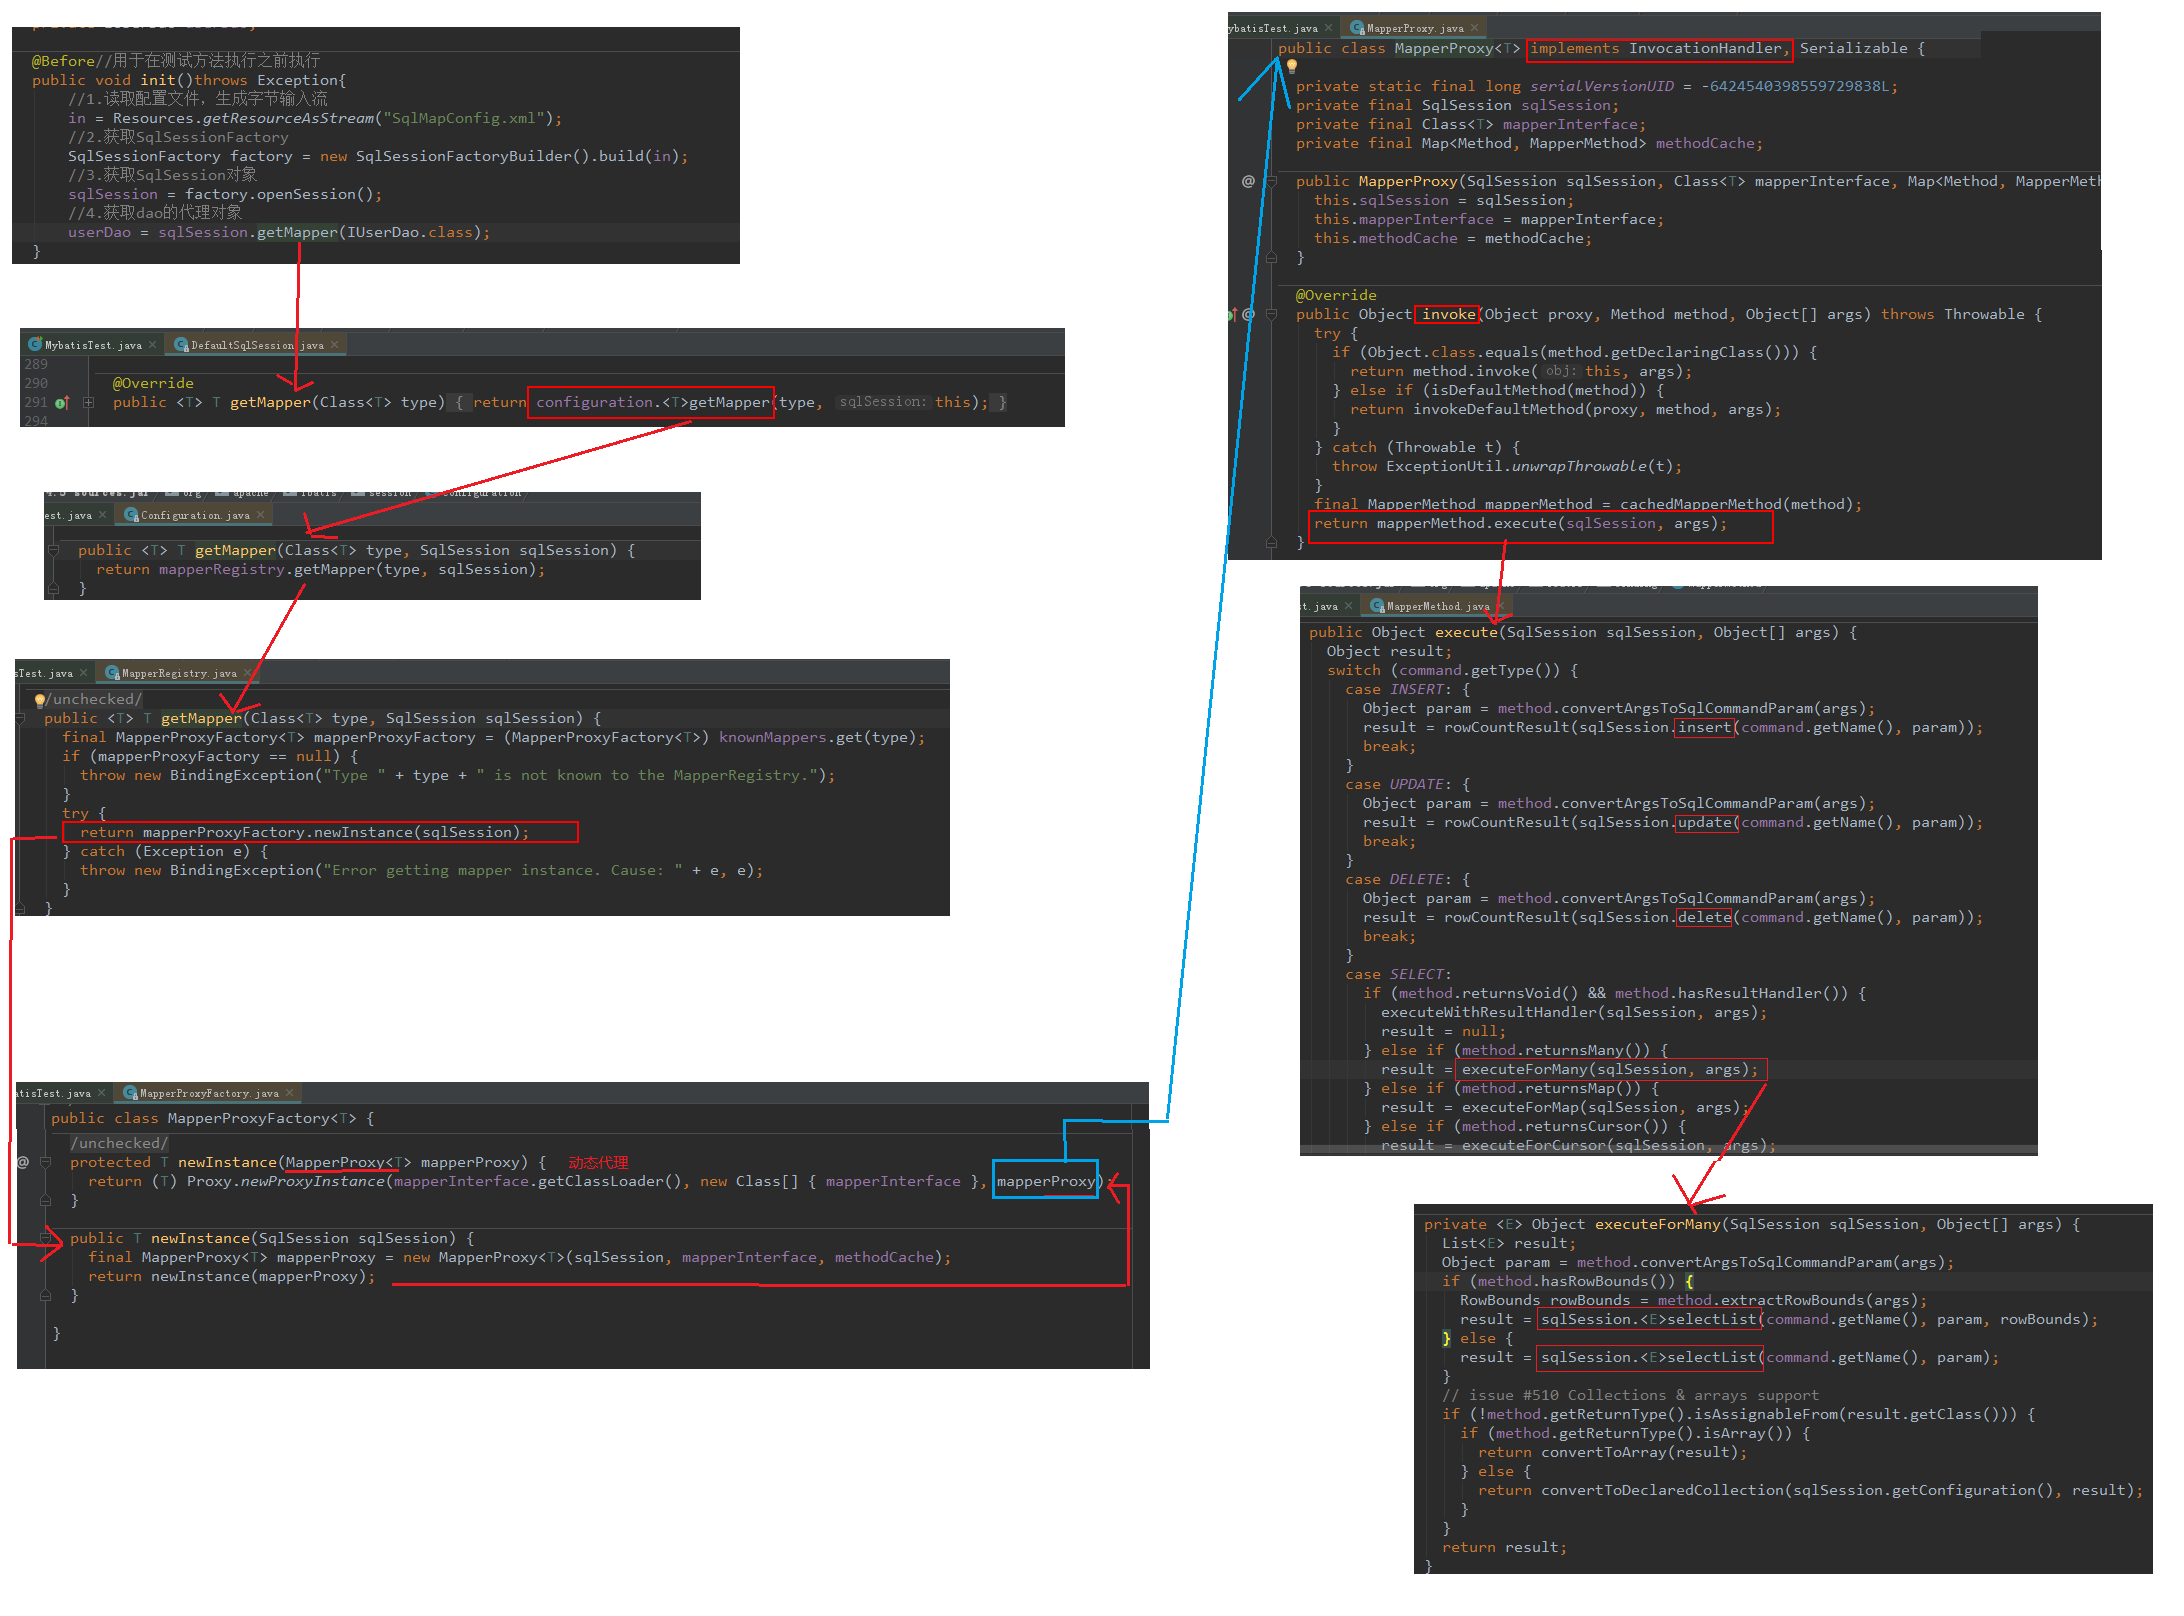
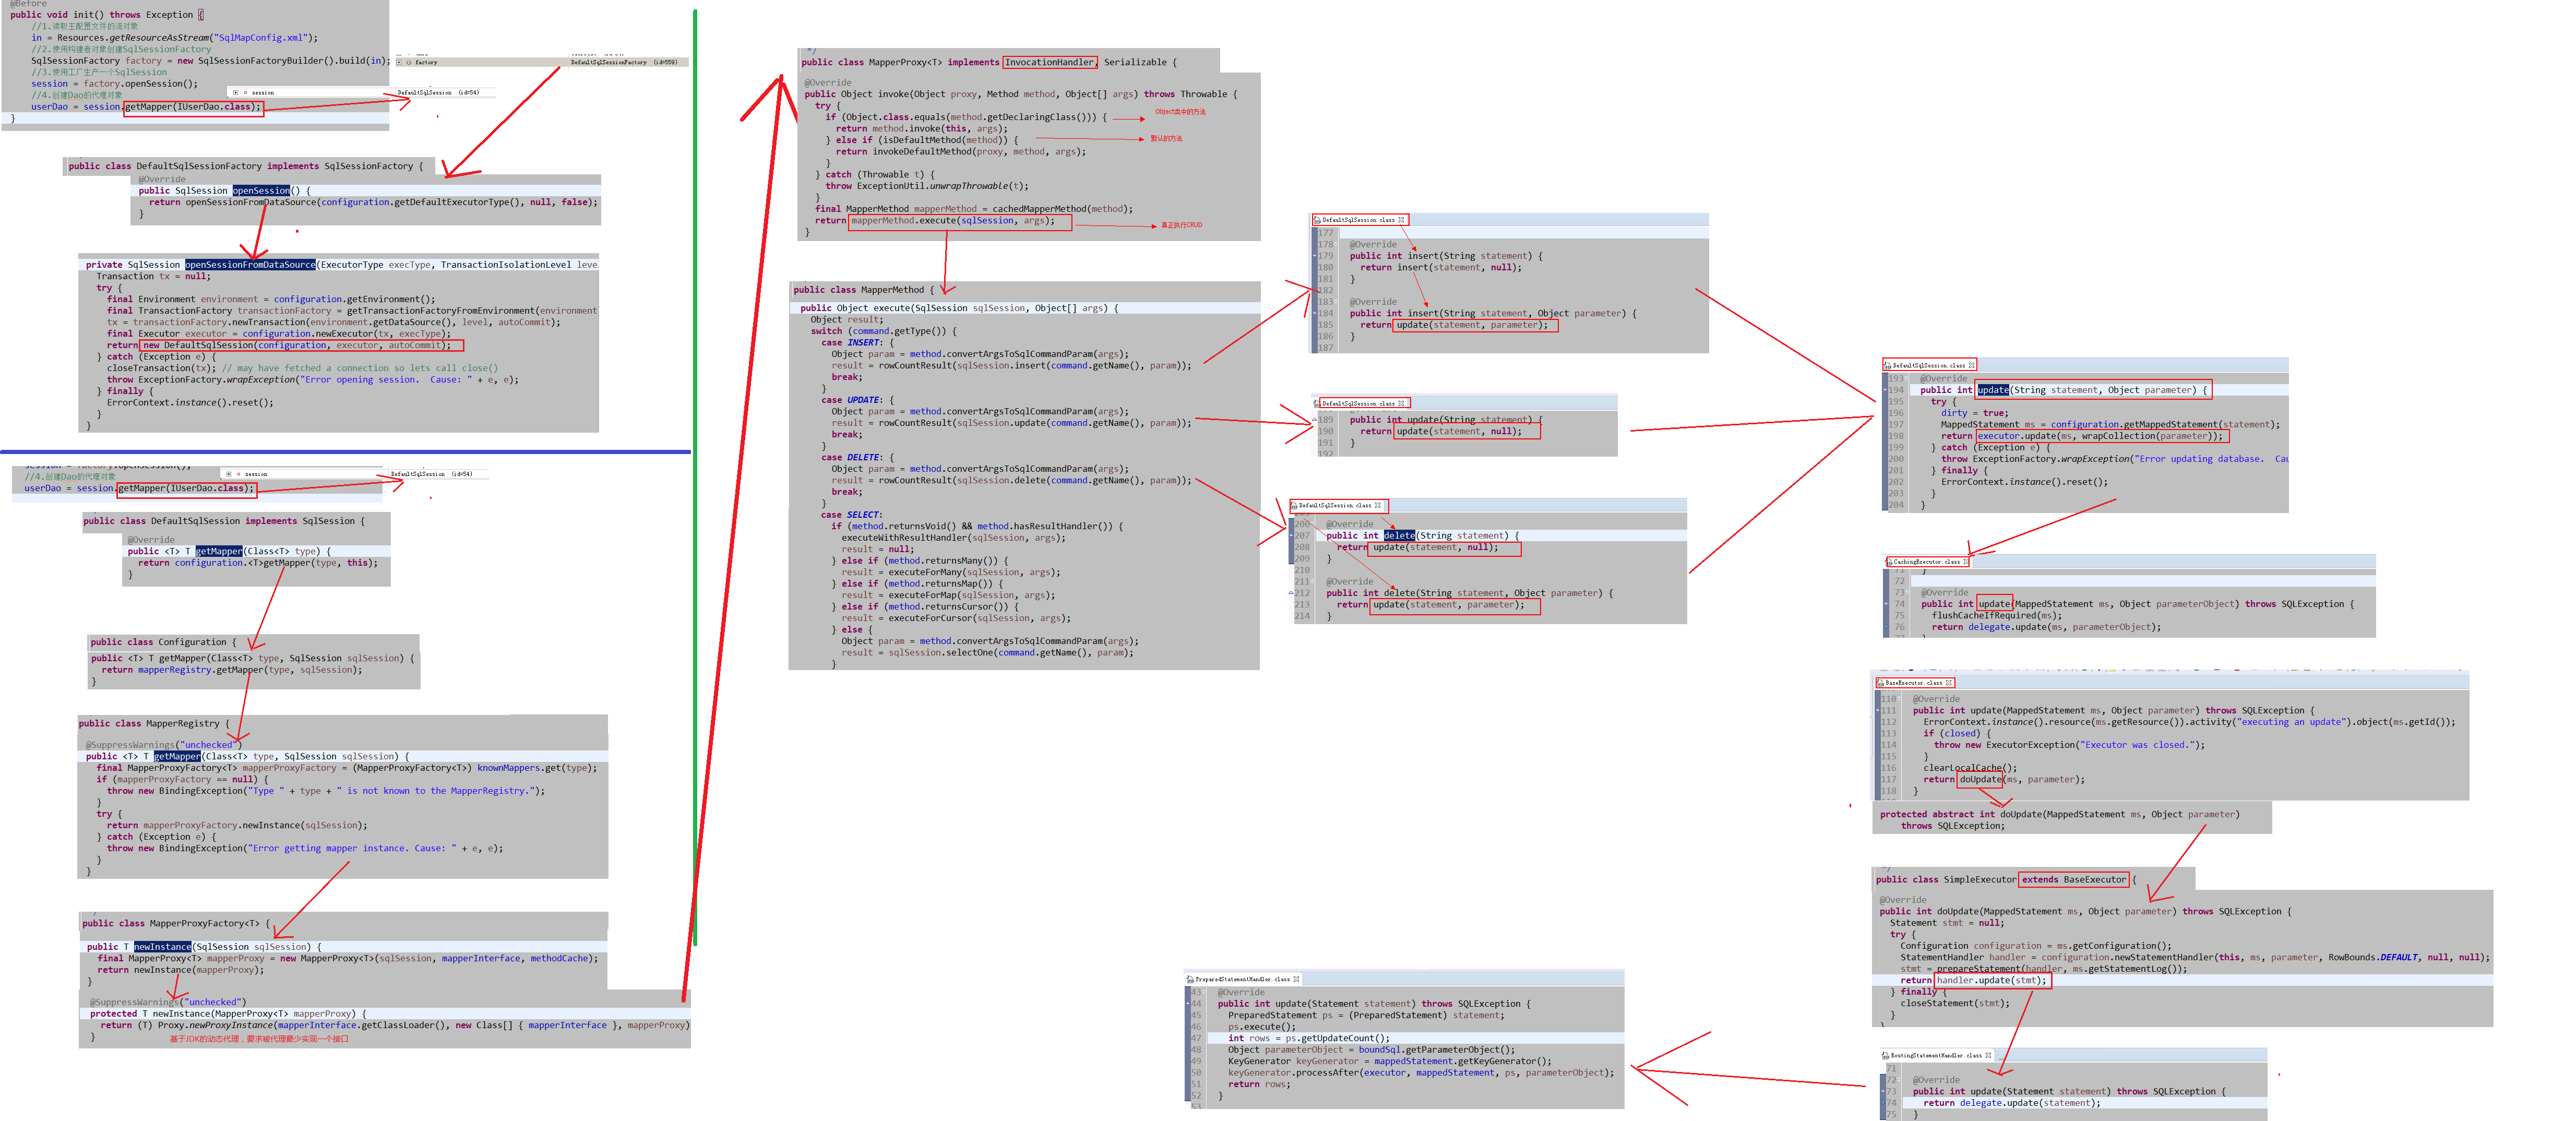
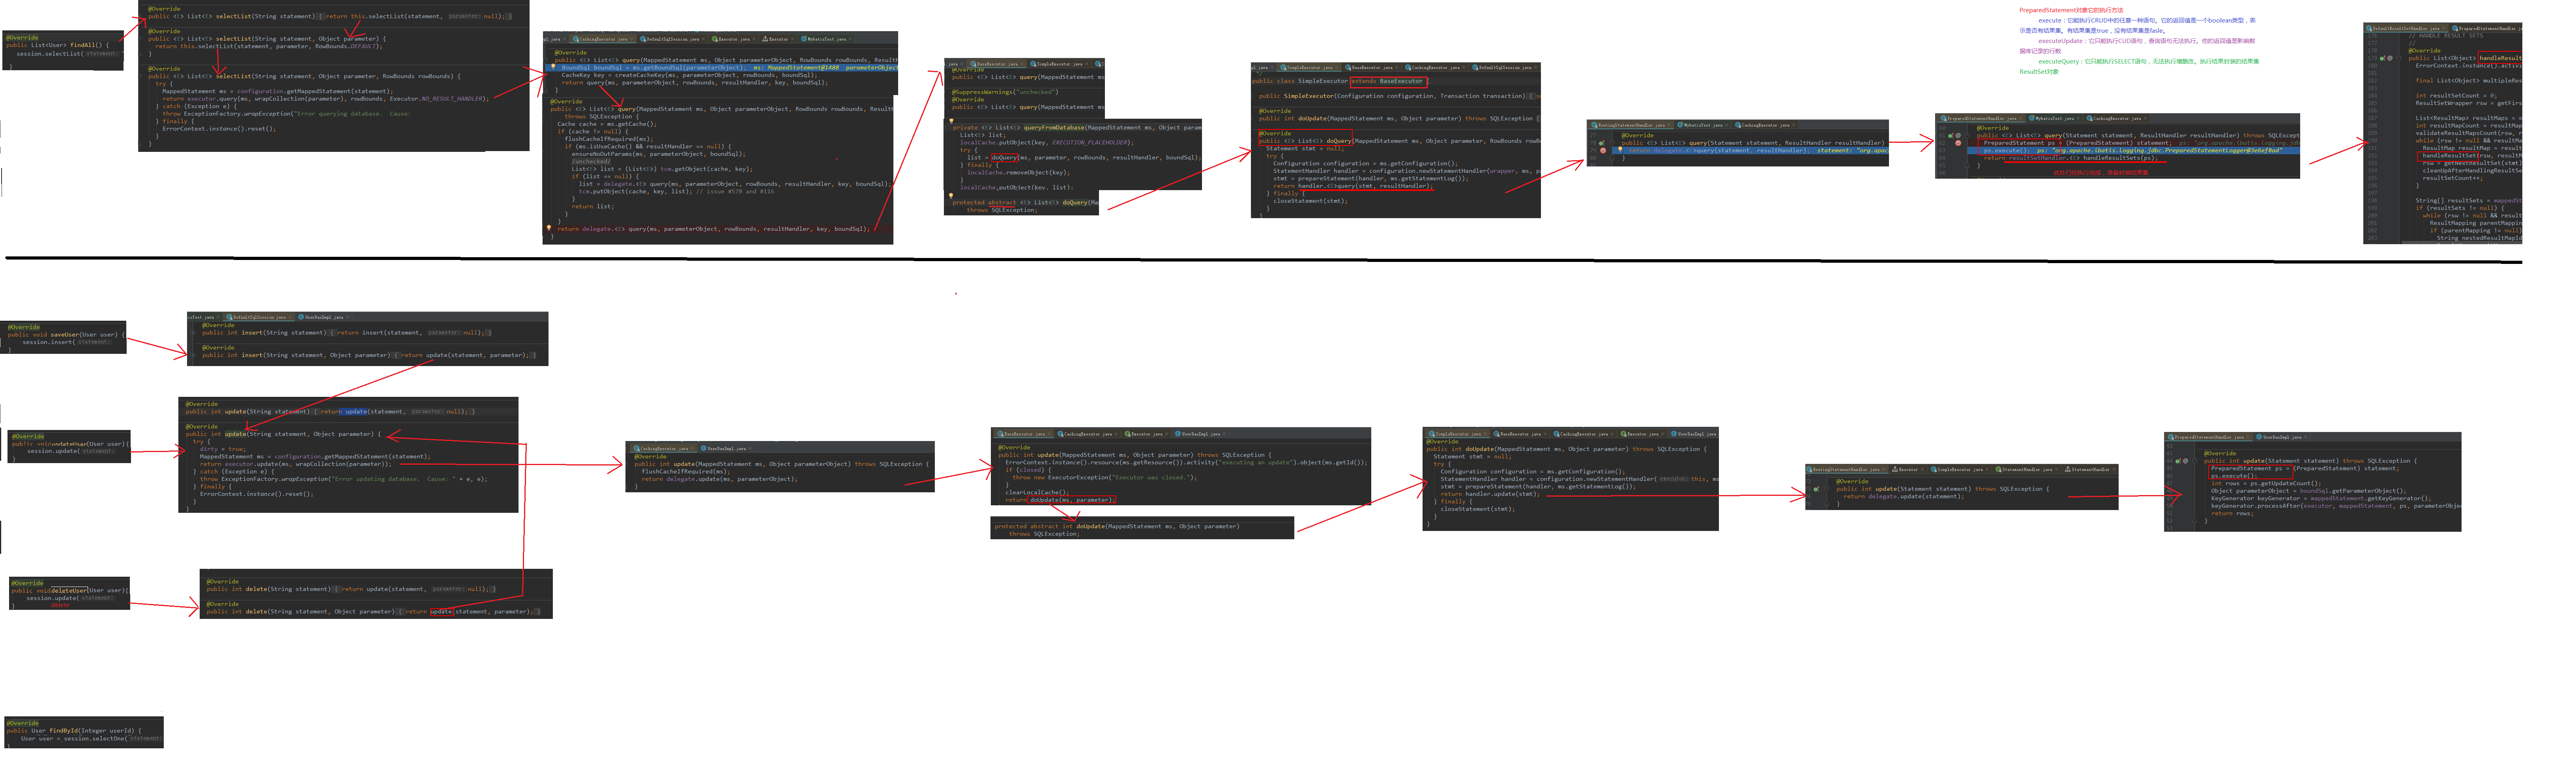
流程分析
代理Dao方式
- SELECT
- INSERT UPDATE DELETE
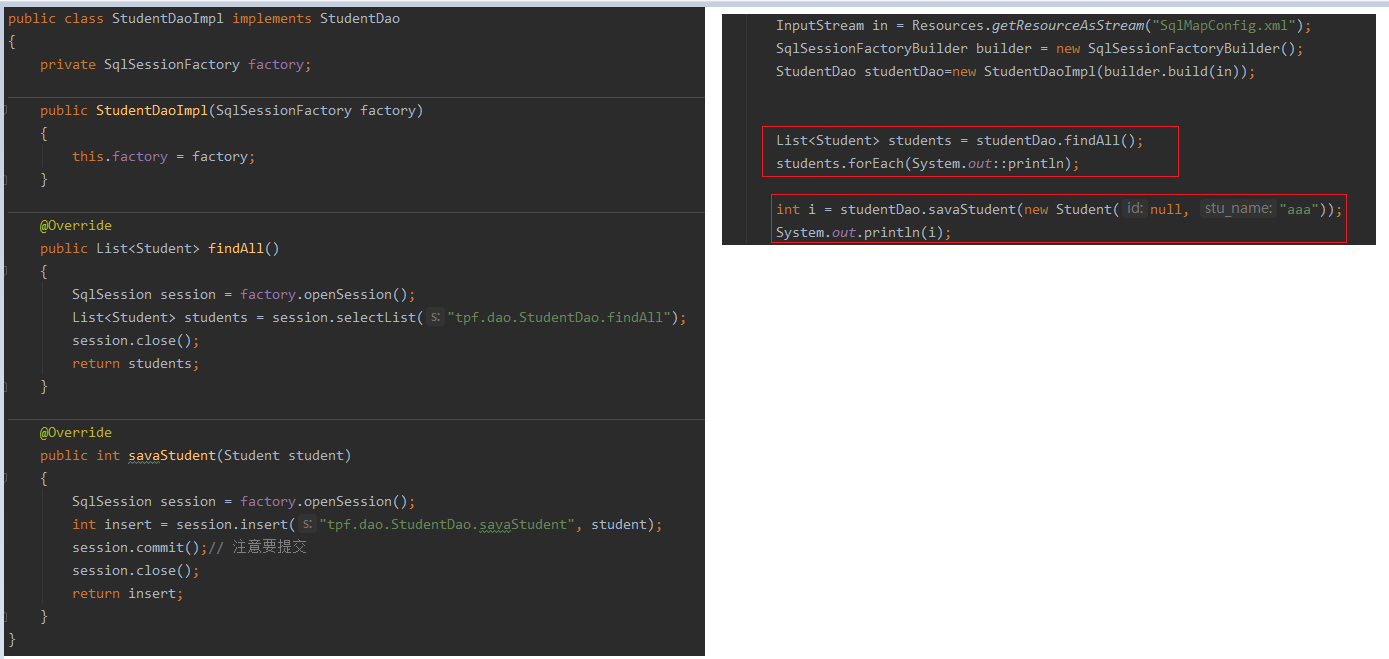
Dao实现类方式(了解)
- 写法
- 过程分析
property&column不对应
- 使用别名(不推荐)
1
2
3
4
<select id="findAll" resultType="com.itheima.domain.User">
select id as userId,username as userName,birthday as userBirthday,
sex as userSex,address as userAddress from user
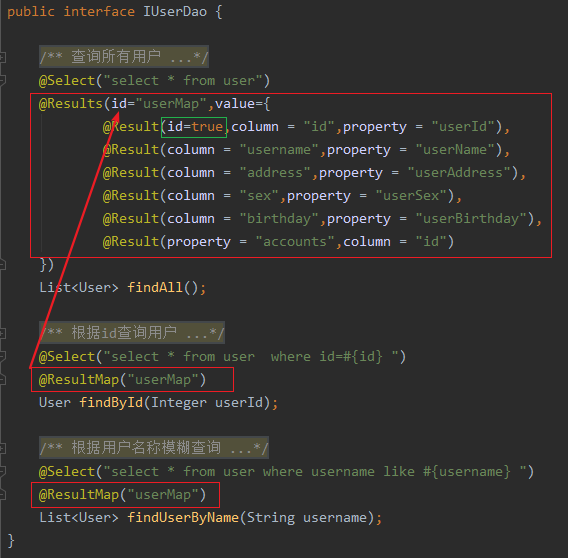
</select> - resultMap(推荐)
1
2
3
4
5
6
7
8
9
10
11
12
13
14
15
16
17
18
19
20
21
<!-- 建立 User 实体和数据库表的对应关系
type 属性:指定实体类的全限定类名
id 属性:给定一个唯一标识,是给查询 select 标签引用用的。
-->
<resultMap type="com.itheima.domain.User" id="userMap">
<id column="id" property="userId"/>
<result column="username" property="userName"/>
<result column="sex" property="userSex"/>
<result column="address" property="userAddress"/>
<result column="birthday" property="userBirthday"/>
</resultMap>
id 标签:用于指定主键字段
result 标签:用于指定非主键字段
column 属性:用于指定数据库列名
property 属性:用于指定实体类属性名称
<!-- 配置查询所有操作【resultMap指向上面的id】 -->
<select id="findAll" resultMap="userMap">
select * from user
</select>
SqlMapConfig.xml
配置文件
配置内容
1 | -properties(属性) |
properties
(属性)
- (方式一
了解)直接写配置信息1
2
3
4
5
6<properties>
<property name="jdbc.driver" value="com.mysql.jdbc.Driver"/>
<property name="jdbc.url" value="jdbc:mysql://localhost:3306/eesy"/>
<property name="jdbc.username" value="root"/>
<property name="jdbc.password" value="1234"/>
</properties> - (方式二
推荐)把内容写在properties中1
2
3
4
5
6
7
8
9
10
11
12
13
14
15
16
17
18
19
20
21
22
23
24*1*在resource目录下定义db.properties文件
jdbc.driver=com.mysql.jdbc.Driver
jdbc.url=jdbc:mysql://localhost:3306/eesy
jdbc.username=root
jdbc.password=1234
*2*properties 标签配置
<!-- 配置properties
可以在标签内部配置连接数据库的信息。也可以通过属性引用外部配置文件信息
resource属性: (推荐)
用于指定配置文件的位置,是按照类路径的写法来写,并且必须存在于类路径下。
url属性:(了解)
file指定本地文件,或 URL
-->
<!--<properties url="file:///D:/mybatisCRUD/src/main/resources/db.properties"></properties>-->
<properties resource="db.properties"></properties>
*3*此时我们的 dataSource 标签就变成了引用上面的配置
<dataSource type="POOLED">
<property name="driver" value="${jdbc.driver}"/>
<property name="url" value="${jdbc.url}"/>
<property name="username" value="${jdbc.username}"/>
<property name="password" value="${jdbc.password}"/>
</dataSource>
typeAliases
(类型别名)
1 | <typeAliases> |
mappers
(映射器)
1 | 1. xml配置文件方式 |
注意:在编译时,java和resource会合并到一个文件夹。
也就是说java下的tpf.dao目录中的东西会和resource下tpf.dao中的东西合并到一个文件夹中去。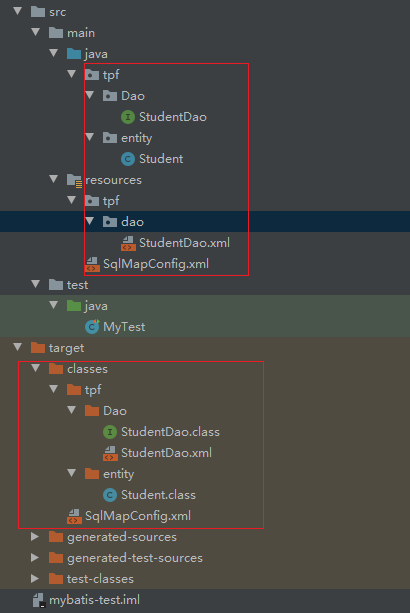
连接池
- 概念
1
2我们在实际开发中都会使用连接池。
因为它可以减少我们获取连接所消耗的时间。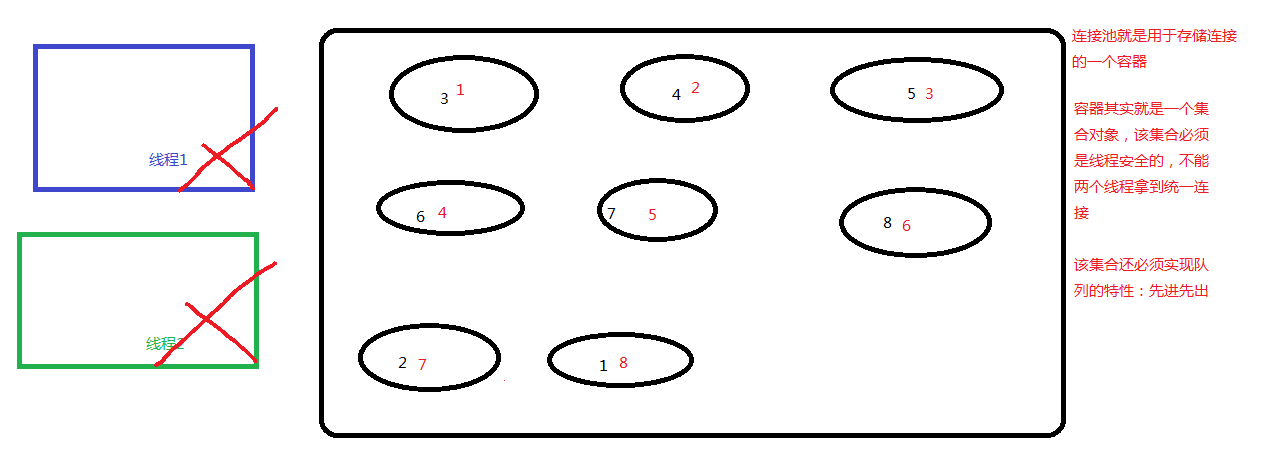
- 实现方式
1
2
3
4
5
6
7
8
9mybatis连接池提供了3种方式的配置:
配置的位置:
主配置文件SqlMapConfig.xml中的dataSource标签,type属性就是表示采用何种连接池方式。
type属性的取值:
POOLED 采用传统的javax.sql.DataSource规范中的连接池,mybatis中有针对规范的实现
UNPOOLED 采用传统的获取连接的方式,虽然也实现Javax.sql.DataSource接口,但是并没有使用池的思想。
JNDI 采用服务器提供的JNDI技术实现,来获取DataSource对象,不同的服务器所能拿到DataSource是不一样。
注意:如果不是web或者maven的war工程,是不能使用的。tomcat服务器,采用连接池就是dbcp连接池。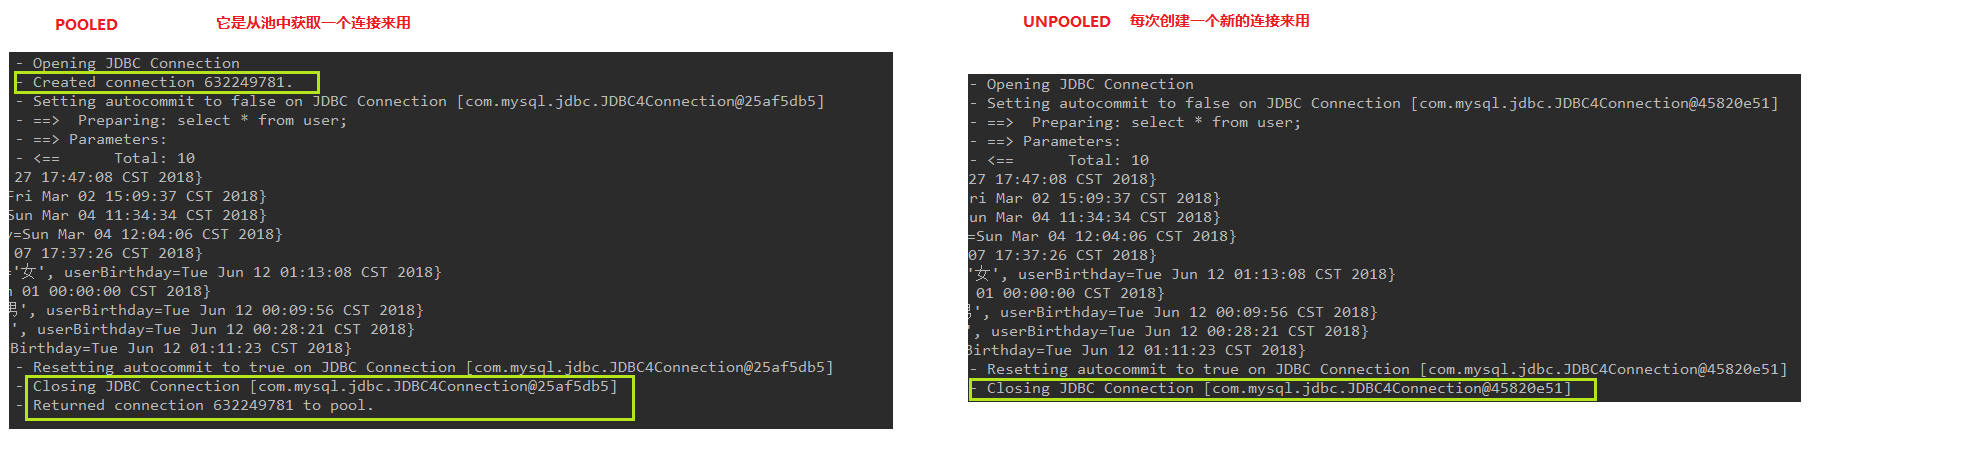
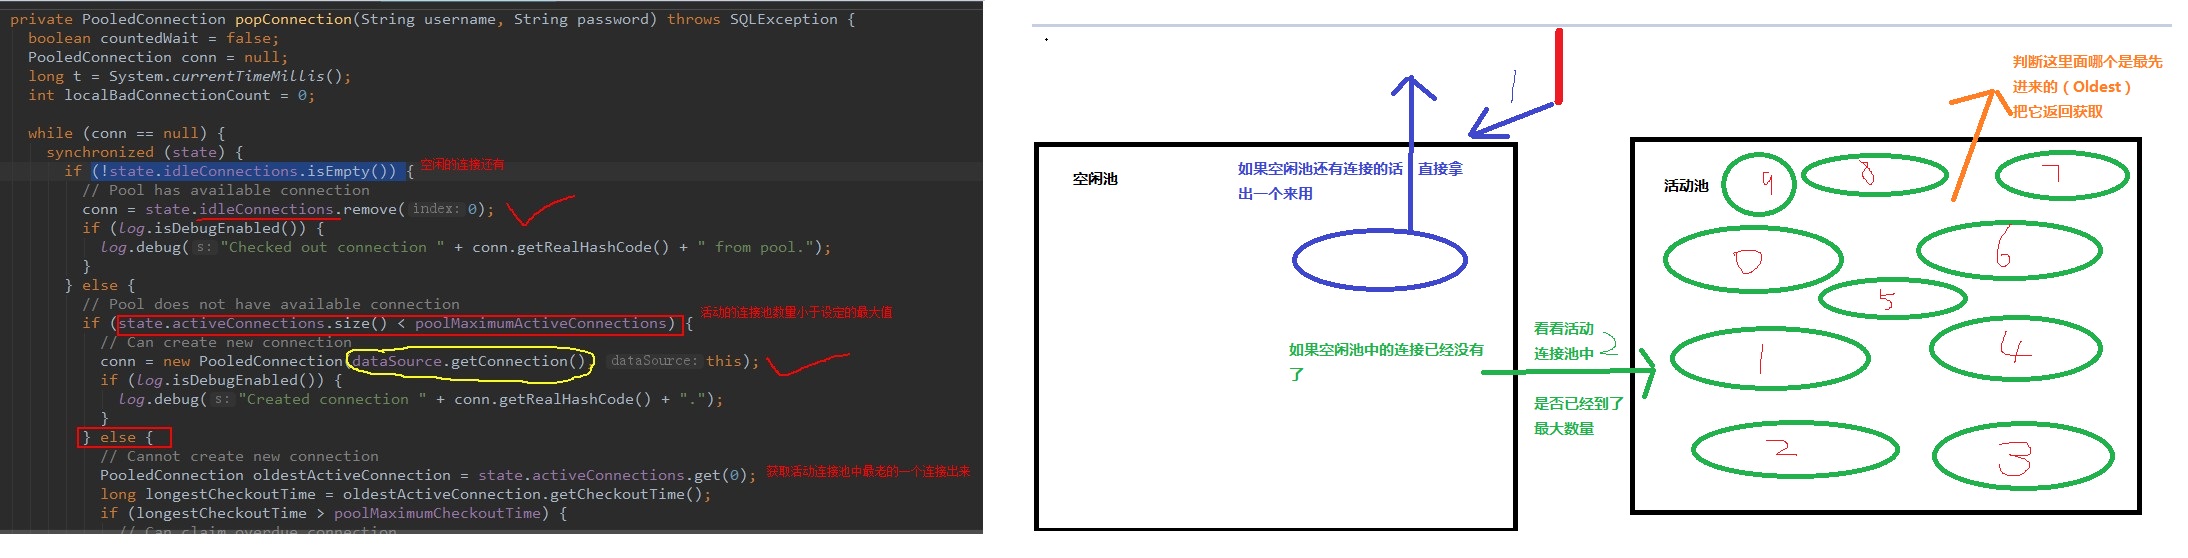
- 原理
事务
动态SQL
if
1 | <select id="findByUser" resultType="user" parameterType="user"> |
where
1 | 为了简化上面 where 1=1 的条件拼装,我们可以采用<where>标签来简化开发。 |
foreach
1 | 传入多个 id 查询用户信息,用下边两个 sql 实现: |
SQL片段
1 | <!-- 抽取重复的语句代码片段 --> |
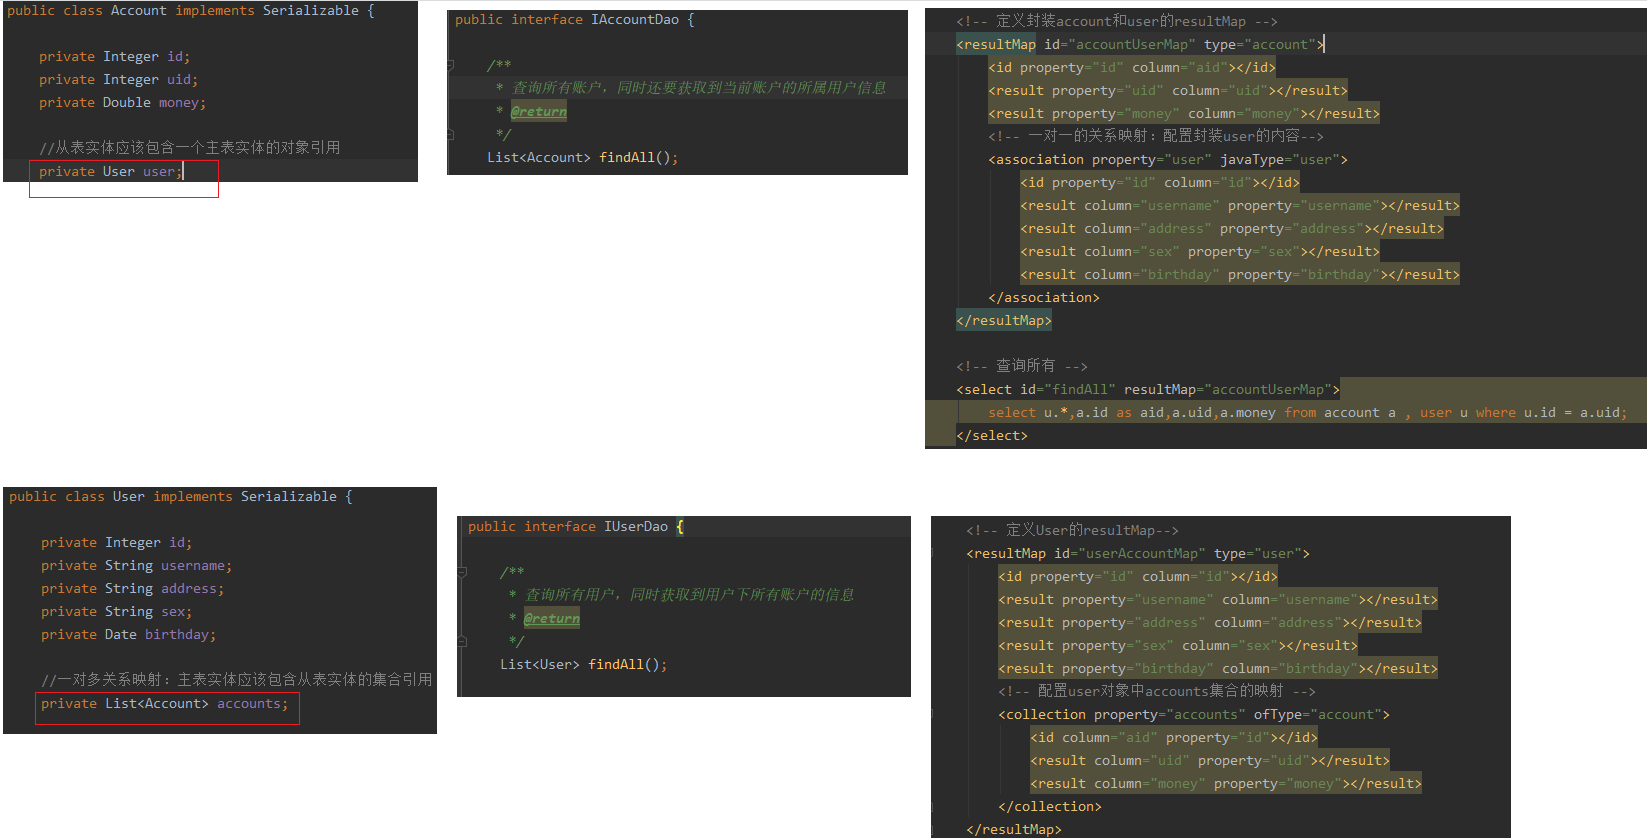
多表查询
1 | 表之间的关系有几种: |
2023-09-27 00:09:04 补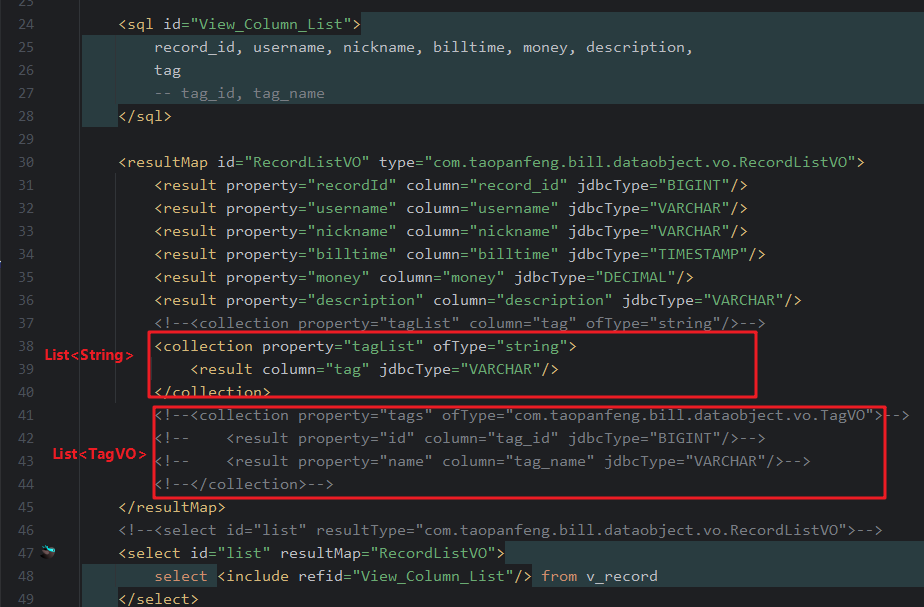
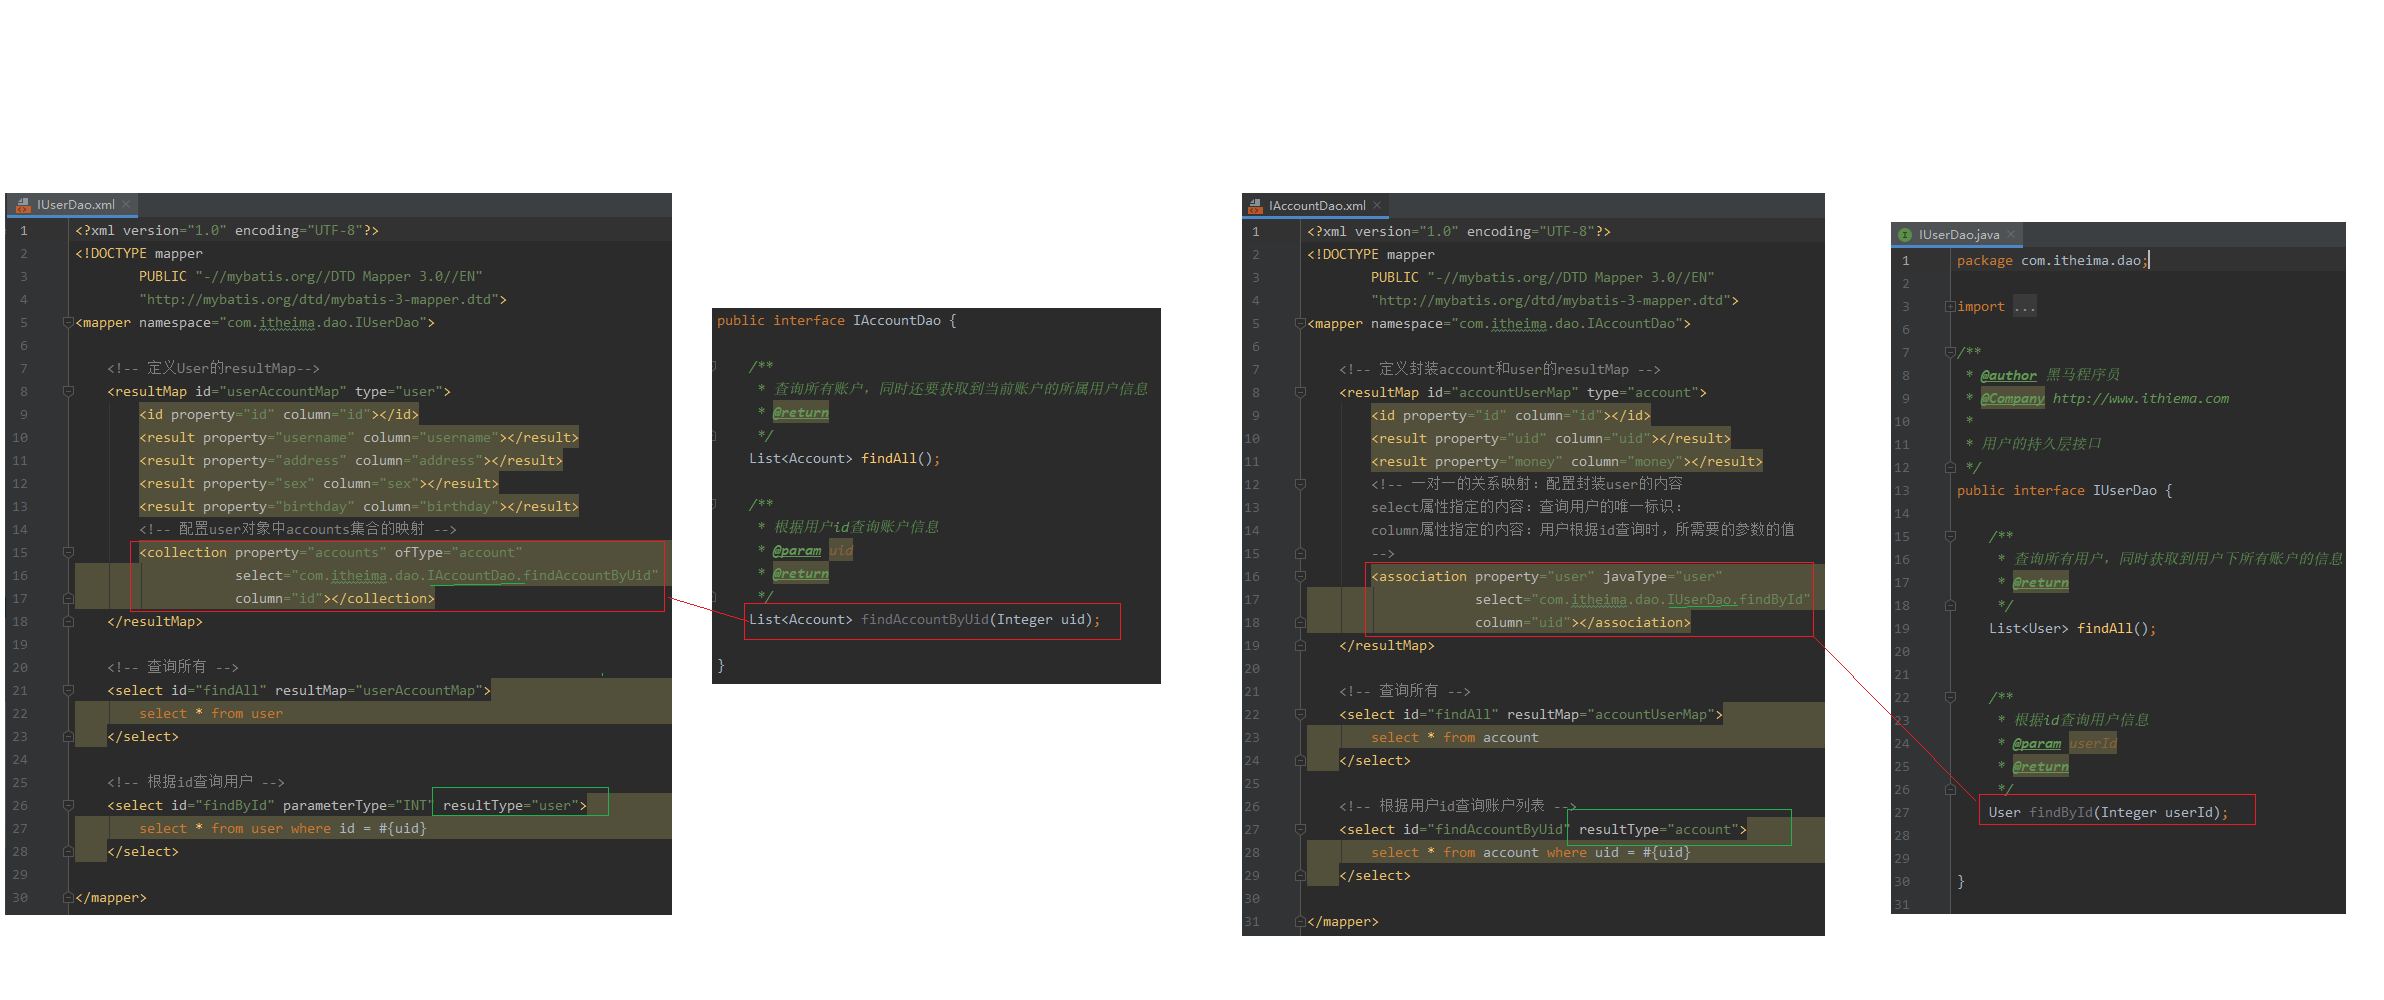
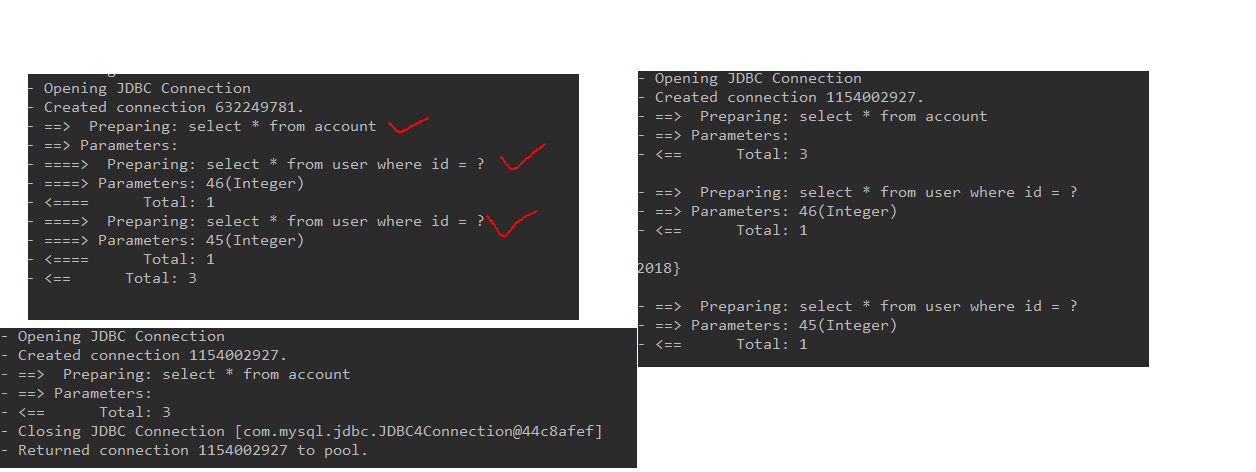
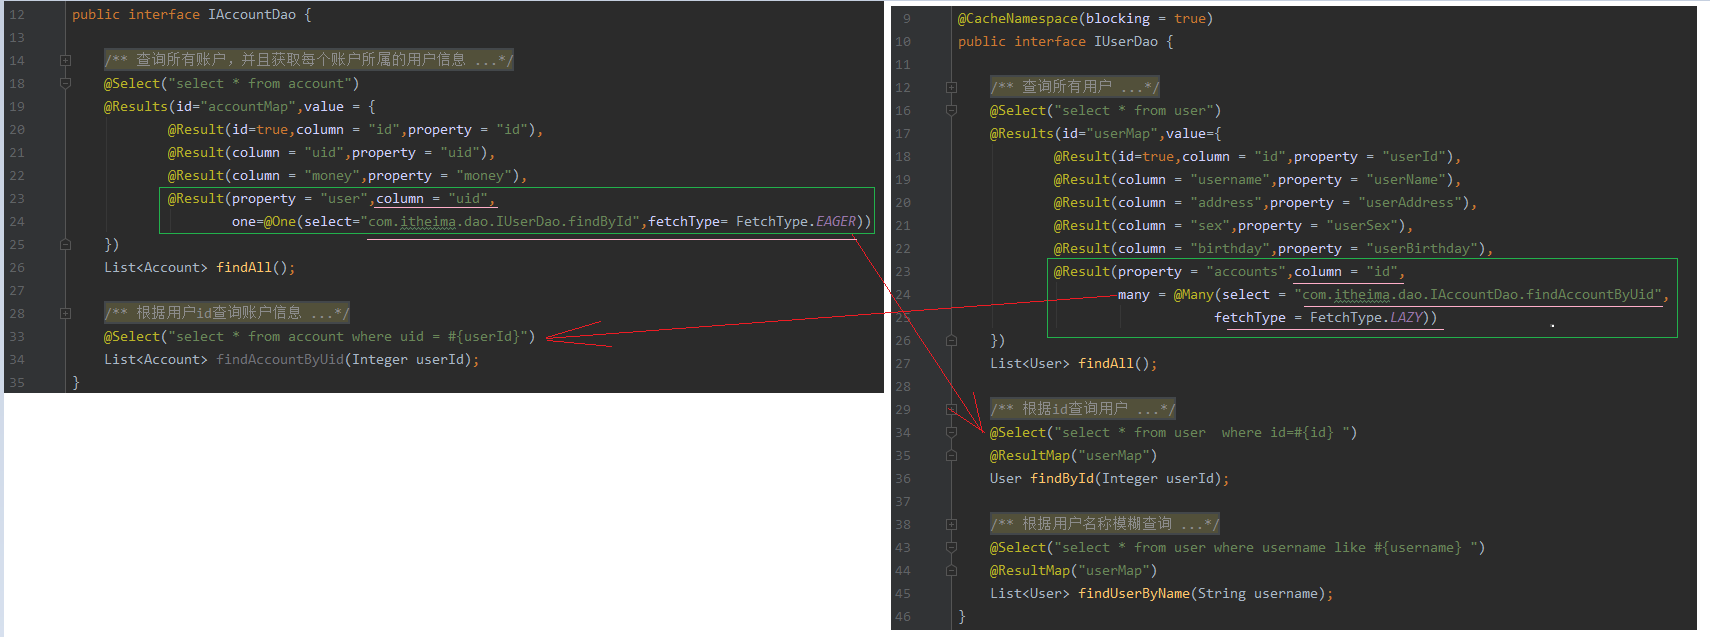
延迟加载
在SqlMapConfig.xml中的configuration模块中添加配置:
1 | <!--配置参数--> |
缓存
- 概念
1
2
3
4
5
6
7
8
9
10
11
12什么是缓存
存在于内存中的临时数据。
为什么使用缓存
减少和数据库的交互次数,提高执行效率。
什么样的数据能使用缓存,什么样的数据不能使用
适用于缓存:
经常查询并且不经常改变的。
数据的正确与否对最终结果影响不大的。
不适用于缓存:
经常改变的数据
数据的正确与否对最终结果影响很大的。
例如:商品的库存,银行的汇率,股市的牌价。
一级缓存
1 | 它指的是Mybatis中SqlSession对象的缓存。 |
- 演示
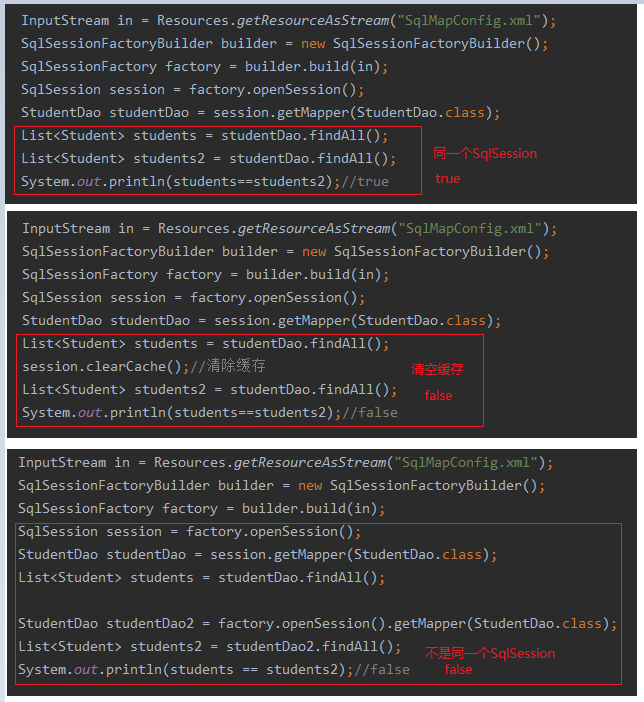
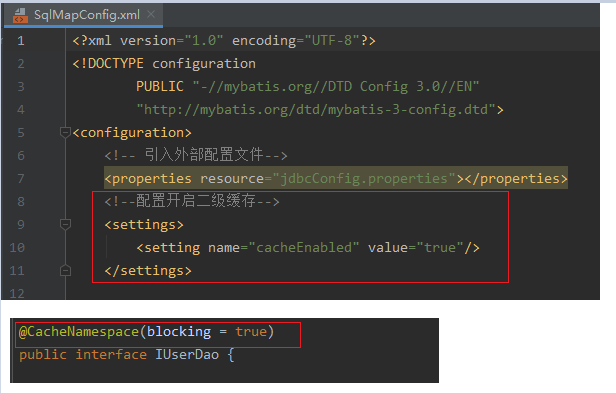
二级缓存
1 | 它指的是Mybatis中SqlSessionFactory对象的缓存。由同一个SqlSessionFactory对象创建的SqlSession共享其缓存。 |
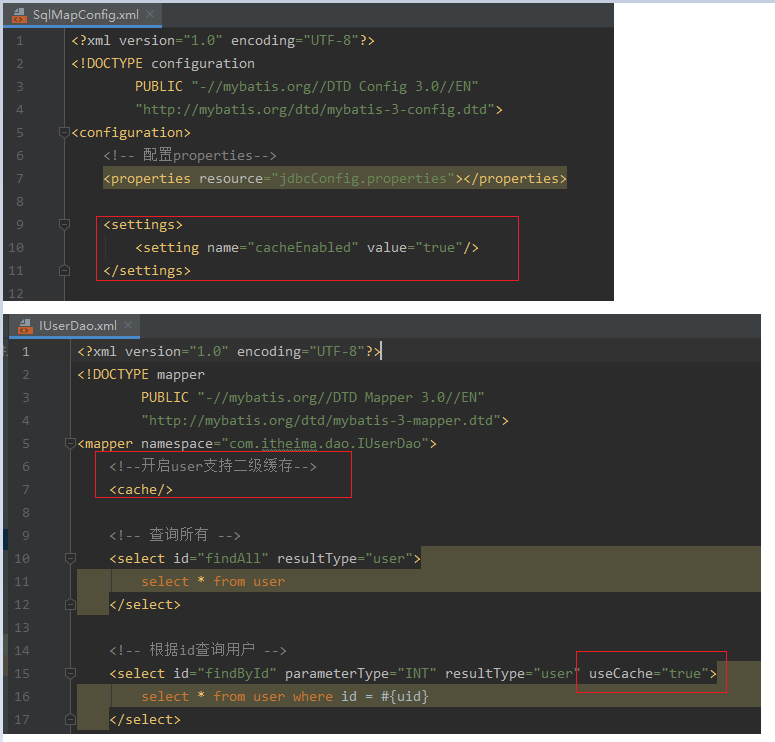
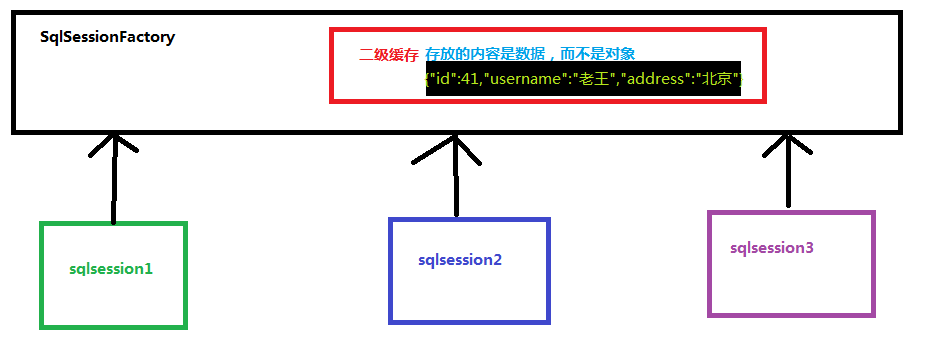
注意:因为保存的是数据,所以要实行对象的序列化implements Serializable
2021-06-25 11:42:38
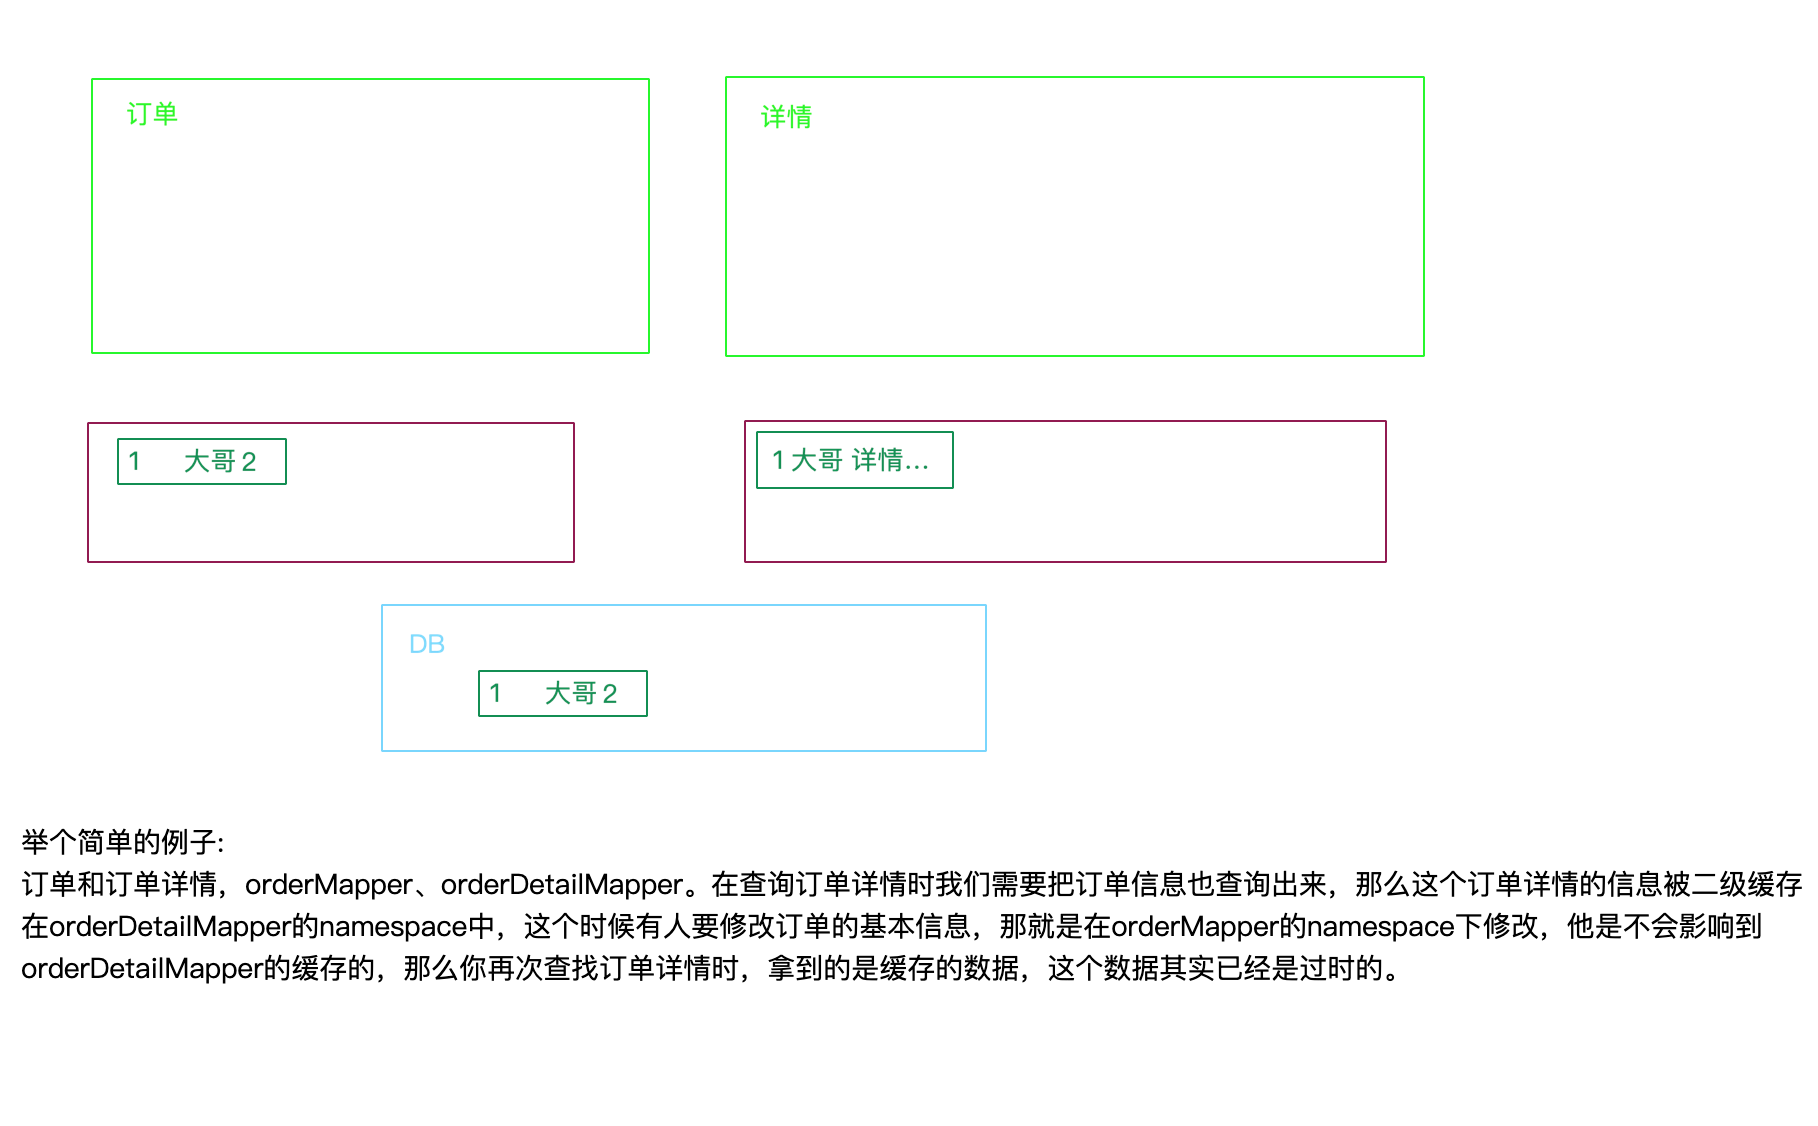
为什么不用二级缓存? ===> 会有脏数据【具体看下图】
怎么去解决?===> 使用同一个会话即可
注解实现
CRUD
Create Read Update Delete
property&column
多表查询,延迟加载
二级缓存